
 JA
JA  EN
EN  ES
ES  DE
DE  PT
PT  IT
IT  ID
ID How to Create an Employee Onboarding Form in WordPress
When a new hire joins the team, HR gets swamped with emails. One asks for their address and emergency contact details. Another sends attachments that employees have to print, sign, and scan. Then again, the IT team asks for the joining date that you already gave HR.
As a result, what happens? Information gets scattered across inboxes, attachments are missed, and HR ends up chasing answers and files. And every missing detail means another follow-up. Every follow-up delays someone else’s work. And your new hire notices all of it before they’ve even started.
That’s why a structured employee onboarding form matters so that you can ask everything from the candidate in one form. In this guide, you’ll learn how to create an onboarding form in WordPress, what fields to include, how to use conditional questions, and how to manage submissions, so let’s begin.
長文要約
- An employee onboarding form collects essential new-hire information in one place, including contact details, job information, equipment needs, documents, and acknowledgments.
- Keep the form short by using conditional logic to show only relevant questions based on the employee’s role or work arrangement.
- Use file uploads, notifications, and confirmation messages to make document collection and follow-up easier.
- Test the form on desktop and mobile before sharing it with new hires.
- In WordPress, you can create and publish the form with a strong form builder such as Bit Form, then manage submissions or connect them to other tools.
What Is an Employee Onboarding Form?
An onboarding form is an online form that collects information that a new hire needs to provide before or during their onboarding. HR no longer has to assemble scattered emails, documents, and attachments; they will get all the information in a single form submission.
Basically, it is an organized way to collect information like previous job details, emergency contacts, equipment requests, documents, and acknowledgments from a candidate.
The main point is to keep the form focused. You should not ask every employee for information that only applies to certain roles or situations. Data protection guidance from the UK Information Commissioner’s Office (ICO) recommends collecting personal information that is adequate, relevant, and limited to what is necessary for the purpose.
Employee Onboarding Form vs. Onboarding Checklist
These two are often treated as the same thing, but they serve different purposes.
| Employee onboarding form | Employee onboarding checklist |
| Collects information from the new hire | Tracks onboarding tasks |
| Usually completed by the employee | Used by HR, managers, IT, and other teams |
| Captures details, documents, and acknowledgments | Tracks what needs to be done and when |
| Produces a submitted record | Helps monitor onboarding progress |
For example, an onboarding form might ask an employee to provide their emergency contact and laptop preference. A checklist might tell the IT team to create their account, prepare the laptop, and grant access to the required software.
Keeping these two workflows separate makes it easier to decide what actually belongs in your onboarding form. A form should collect information or approvals that the employee needs to provide, while the checklist can handle the tasks your internal teams need to complete.
Now that both terms are clear, let’s focus on what a new hire onboarding form should ask.
What Should an Employee Onboarding Form Include?
An onboarding form should collect what HR, payroll, IT, and the new hire’s manager need to get someone started. What exact fields your company’s onboarding form will contain depends on your company, role, and local requirements, but most forms can be organized into a few clear sections.
| セクション | What to ask | Who uses it |
| Personal details | Full legal name, personal email, phone number, home address | HR, payroll |
| Emergency contact | Name, relationship, phone number | HR |
| Role details | Job title, department, manager, start date, employment type, work location (office, remote, or hybrid) | HR, manager, IT |
| Payment and tax setup | Usually a link to your payroll system, not fields in this form (more on that below) | Payroll |
| Equipment and access | Device preference, software needed, remote setup, shipping address if remote | IT |
| Policy acknowledgments | Employee handbook, code of conduct, confidentiality agreement, IT usage policy, with a signature | HR |
| Optional extras | Dietary needs for a welcome lunch, T-shirt size, pronouns | Manager, office team |
Mark the last section as optional. Nobody should feel forced to share personal preferences with a company they haven’t started working for yet.
How to Create an Employee Onboarding Form in WordPress (Complete Setup)
If you already use WordPress for your internal workflow, you can create the onboarding form directly on your site using a reliable form builder.
So, for this walkthrough, we’ll use Bit Form to build the form from scratch. You can use templates from the template library. Apparently, Bit Form offers 30+ ready-made templates in different categories. Other than that, there are other useful features like conditional logic, spam protection, email OTP verification, and more, which you’ll get to know gradually.
The goal is to create a practical form that collects the information a new hire needs without turning the process into a complicated HR system.
Step 01. Create a New Form
After installing and activating Bit Form, go to the Bit Form dashboard and select “+「フォームを作成」”. Start with a blank form and structure it around the information your HR team actually needs.


Give the form a clear name such as New Employee Onboarding Form. This is helpful when you manage several forms for different HR processes.
Step 02. Divide the Form Into Sections
Longer forms have relatively lower completion rates than shorter forms. However, that doesn’t mean you have to skip the necessary questions that you need to ask. In that case, it is better to split the long forms into smaller sections. For example, in the personal information section, you’ll collect only the contact details about the employee. Then, in other sections, you may collect other relevant info.
Group related information so employees can move through the form without feeling like they are completing a long questionnaire.
For this form, I’ll be following this simple structure:
- 個人情報
- Employment Details
- Emergency Contact
- Documents, Payment, and Policy Confirmation
Since I’ve several sections, a 複数ステップフォーム can make the flow easier to follow. Bit Form supports multi-step forms, including step navigation and progress settings, and the setup is also easy.

Step 03. Add the Required Fields
Now add the fields you identified earlier. For example, the personal information step might include:
- 名
- 姓
- Preferred Name
- Personal Email
- 電話番号
- 住所
The employment section could include:
- 職名
- 部署
- 開始日
- Employment Type
- Work Arrangement
- マネージャー
Bit Form comes with 50+ different form fields, including name, email, phone Number, address, Date, Select, Radio Button, Checkbox, and File Upload.
Mark those fields as required, without which you cannot onboard the new hire. Keep some not-so-important fields optional to make form filling less overwhelming for the candidates.
Keep the form focused on information you actually need. If a detail already exists in your HR system and there is no reason to collect it again, leave it out.
Step 04. Add Conditional Questions
Different employees may need to answer different questions. Conditional logic lets you show those questions only when they apply.
For example, a contract-based employee may need to answer when their contract ends. Similarly, if your Work Arrangement (remote, on-site, hybrid) question has three choices, each one should have a different answer.
If the employee selects Remote/Hybrid, you could show questions about their home-office setup or equipment delivery. If they select Office, those questions can remain hidden.
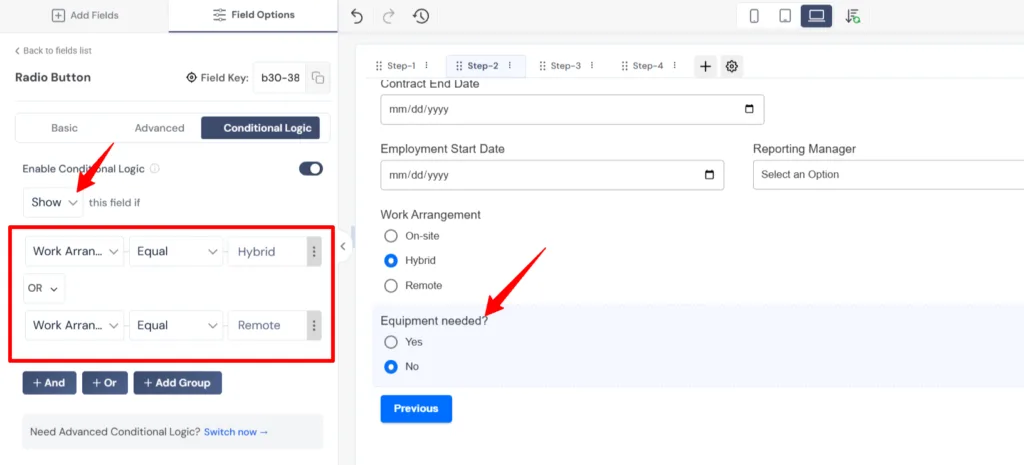
ノート: Bit Form supports basic show and hide rules, as well as more advanced conditions using AND and OR logic.
For a closer look at how these rules work, you can see how conditional logic in WordPress forms can show or hide fields based on previous answers.
This keeps your new hire onboarding form shorter while still allowing you to collect role-specific information.
Step 05. Add Document Uploads
If employees need to submit documents as part of the onboarding process, add a ファイルアップロード field to the relevant section.
Like, I’ve created a separate section for documents like a CV, national ID, or passport.
You can simply store the files on your server, but for longer files, it is better to store them in cloud storage like Dropbox and Google Drive. Otherwise, they might slow down your site, use up hosting space quickly, and make management difficult.
Step 06. Set Up Confirmation and Notifications
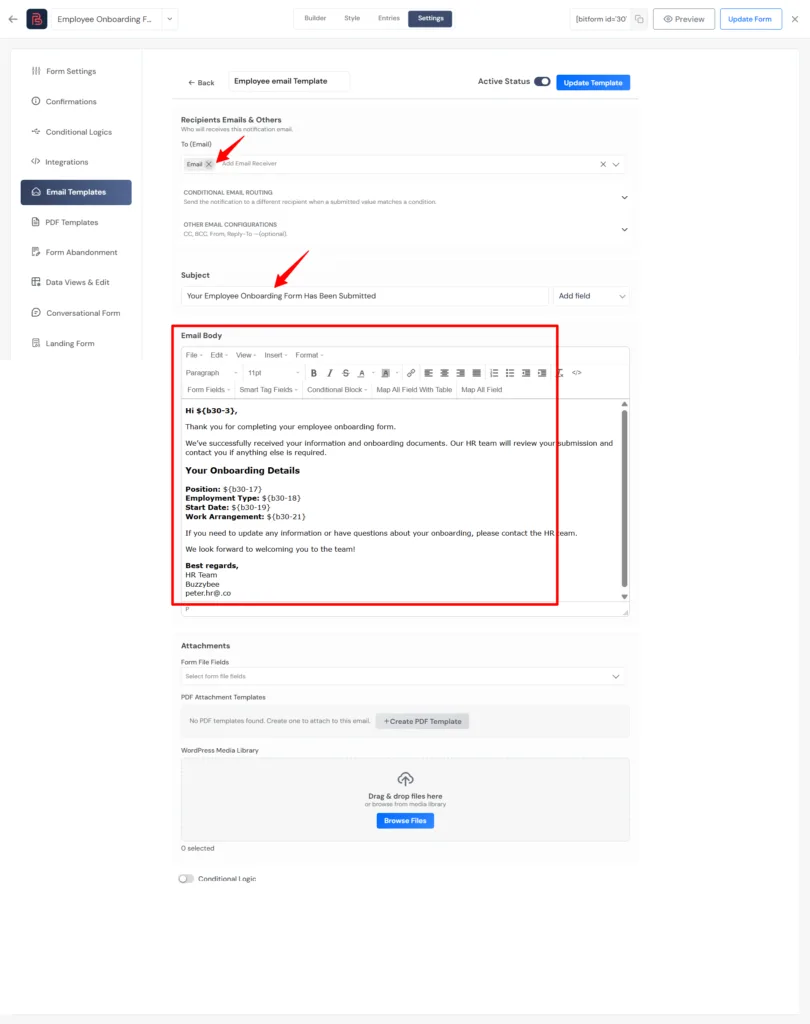
After submission, the employee should know that their information was received. At the same time, the right HR or administrative team should receive the submission.
You can display a success message or redirect the employee to a separate thank-you page. You can also configure email notifications with submitted form data and create separate email templates for both the hire and the recruiter.
For example, an HR メール通知 could include the employee’s name, department, and start date. The employee-facing message can simply confirm that the form was received and explain what happens next.

Step 07. Test the Form Before Sharing It
Before sending the onboarding form to a new hire, submit it yourself.
Check that:
- Required fields work correctly
- Conditional questions appear as expected
- File uploads work
- Confirmation messages display properly
- HR receives the notification
- The form works well on mobile
- No unnecessary questions are shown
Testing the complete submission flow is especially important when the form uses conditional fields or file uploads. It lets you catch problems before an employee encounters them.
Step 08. Publish and Share the Form
Once everything works, publish the form on the WordPress page where new employees can access it.
If you need to share the form separately from your main website pages, Bit Form’s Landing Form feature can provide a direct URL for the form. You can also embed the form into a WordPress page.
If you want to send responses somewhere other than the WordPress dashboard, you can also connect WordPress forms to Google Sheets and keep onboarding responses in a spreadsheet for the relevant team to review.
At this point, your employee onboarding form is ready.
The next step is making it easier for employees to complete while keeping the amount of information you collect under control.
How to Make Your Onboarding Form Easier to Complete
A form can collect everything HR needs and still feel frustrating if employees have to work through a long list of unrelated questions. Here are a few ways to improve the experience.
Keep the form organized
Group related questions together instead of placing every field on one long page. As I mentioned previously, Personal details, employment information, equipment requests, and documents should have their own sections.
If the form has several sections, a 複数ステップフォーム can make the process easier to follow. Employees can quickly complete the form by completing one group of questions at a time.
Ask only what you need
Avoid adding fields simply because they appear in an employee onboarding form template. Every question should have a clear purpose.
This is especially important when collecting personal information. The ICO recommends keeping employee information adequate, relevant, and limited to what is necessary for the stated purpose.
For example, if you only need to know whether someone works remotely to prepare equipment, you may not need several additional questions about their home setup.
Use conditional questions
Not every employee needs to answer every question. For example, if the new hire is an intern, then you may ask about the internship period. On the other hand, if he/she is a full-time employee, then this question is irrelevant.
So, when you use a condition-based approach, the form stays shorter and reduces unnecessary data collection.
Make required fields obvious
Only mark a field as required when you genuinely need the answer. Making too many fields mandatory can make employees stop and search for information they may not have at hand.
For required documents, explain what the employee needs to upload and which file types you accept. A short instruction near the upload field is usually enough.
Make the form easy to use on mobile
Mobile responsiveness is non-negotiable, because most of the applicants apply from their smartphones and are comfortable continuing the conversation on them. Make sure the forms look perfect on different devices; this will significantly improve completion rate.
Similar to this, there are some best form design practices that you can follow to convert more.
Tell employees what happens after submission
Do not skip this step. A simple confirmation message can remove uncertainty. Let the employee know that their information was received and explain what happens next.
Where to Store and Manage Onboarding Responses
Once employees submit the form, you need a reliable way to review and organize the information. Sending every response to an inbox can work for a small team, but it becomes harder to manage as submissions increase.
Your setup will depend on how your HR team already works.
Keep responses in WordPress
If you build the employee onboarding form with Bit Form, submitted entries can be managed from the form’s response area. You can view individual submissions, edit or delete entries, filter records, and export response data when needed.
This is suitable when HR wants to review onboarding information without moving every submission into another system.
Send responses to a spreadsheet
If your HR team already tracks new hires in Google Sheets, you can connect the form to a spreadsheet and send submitted information there. Bit Form supports Google Sheets integration for this workflow.
Basically, when HR needs to sort employees, assign follow-up tasks, or share selected onboarding information with other team members, they follow this workflow.
Connect the form to other systems
Larger teams may want onboarding submissions to trigger actions in other tools. For example, a submission could be passed to a CRM, recruitment system, automation platform, or another internal workflow.
The important part is to decide where each piece of information should live before connecting multiple systems. Copying the same employee data into several places can create duplicate records and make it harder to control access or remove outdated information.
Review access and retention
Employee onboarding forms can contain personal information, documents, and other details that should not be available to everyone.
The ICO recommends limiting access to authorized people and considering how long employee information needs to be retained.
Before publishing your form, decide who should be able to view submissions, where files will be stored, and when information should be removed according to your organization’s legal and retention requirements.
If your workflow needs more structured entry management, Bit Form also provides Data Views and Edit controls for managing who can view or edit submitted records.
最終的な考察
A good employee onboarding form should make the first few steps easier for both the new hire and the HR team. Start with the information you actually need, group related questions together, and use conditional fields when different employees require different information.
If you are building the form in WordPress, Bit Form gives you the core tools needed for this workflow, including multi-step forms, conditional logic, file uploads, email notifications, confirmations, and external platform integrations.
The best approach is to build the form around your existing onboarding process rather than trying to turn the form into the entire process. Let the form collect employee information, while your internal onboarding checklist handles the tasks HR, managers, and IT need to complete.
よくある質問
What should an employee onboarding form include?
An employee onboarding form should ask for the new hire’s name, contact details, job title, department, start date, emergency contact, equipment needs, required documents, and policy acknowledgments. Asking too much can make the candidate uninterested. Only include fields that are relevant to your organization’s onboarding process.
What is the difference between an onboarding form and an onboarding checklist?
An onboarding form collects information from the new hire, such as contact details, emergency contacts, equipment needs, and documents. An onboarding checklist tracks tasks that HR, managers, IT, and other teams need to complete during the onboarding process.
When should an employee complete an onboarding form?
An employee onboarding form is usually completed after the person accepts the job and before their first day. Collecting the information early gives HR and other teams time to prepare accounts, equipment, access, and other onboarding requirements.
Should an employee onboarding form allow document uploads?
Yes, most onboarding workflows require documents from new hires like a CV or NID. That’s why an onboarding form should allow file uploads for records, but the exact documents should depend on your organization’s legal and HR requirements.
Can an employee onboarding form show different questions based on an employee’s role?
Yes. Conditional logic can display different questions based on previous answers. For example, a form can show software-access questions for a developer or equipment questions for a remote employee. This keeps the form shorter and avoids asking every employee irrelevant questions.
How can I keep employee onboarding form data secure?
Collect only the information you actually need, limit access to authorized people, choose an appropriate storage system, and define how long the information should be retained. Sensitive employee information should not be collected or shared simply because it appears in another onboarding template.


関連ブログ
How to Create a WordPress Stripe Payment Form Without WooCommerce

How to Create a Fundraising Event Registration Form With Payments