Got a big collaboration event coming up this Thursday?
And you’re all tied up waiting for emails and calls from attendees. Hold on! I have an easy and smart way to simplify your work. Add an event RSVP form to your website!
And if you’ve a WordPress website, then adding an RSVP form is even easier. Studies show that using RSVP forms for event management increases the percentage of attendance by 27%. Because this is quicker and easier for guests. This type of form not only keeps track of guests but also makes the event successful.
This blog will be a step-by-step tutorial on how to create an RSVP form with conditional logic in WordPress so that you can effortlessly keep track of guests and make the event successful.
When you send out invitations for an event or a party, the next thing you wait for is their presence at the event. However, some just don’t show up without any notice, ultimately leading to last-minute inconveniences and chaos. Exactly, that’s where RSVP forms save the day.
Setting up an RSVP form ensures no invitation gets ignored. In case some of you might not know what is an RSVP form, let me explain. RSVP basically comes from a French phrase, “Répondez s’il vous plaît,” which means “Please respond”. This form collects confirmation from the attendees whether they’re attending the event or not.
In short, an RSVP online form makes event planning easier, faster, and more organized.
RSVP forms have nowadays become a must-have feature for any event website. Luckily, this trend is for good; these forms save time, simplify event planning, and most importantly, ensure no response is missed. Let me show you some aspects of how an RSVP form in your WordPress site can be a game-changer, which was an overwhelming task to do manually earlier:
![]() Note
Note
Bonus tip: You can make your WordPress RSVP form smarter with conditional logic. For example, when your guests select the option “Attending,” only then they will be shown the “meal preference” question.
To get started, you’ve to install a WordPress form builder. You can choose any form builder of your choice. Here, I’ll be using Bit Form, the most advanced form builder with 40+ advanced fields, 31 form templates, and more amazing features. With this drag-and-drop builder, you can create any type of advanced form, like custom contact form, multi-step form, payment form, order form, calculator form, and so on.
So, open the WordPress dashboard and go to the “Plugins” section. Click on the “Add Plugin” button at the top of the page. Then search for Bit Form and install and activate the plugin.

Open Bit Form dashboard, tap on the “Create Form” button, and start designing your RSVP event form.

As mentioned earlier, Bit Form comes with 40+ input fields you can see on the left side menu. You can simply drag and drop fields from there and customize them by configuring field settings on the right side.

In this event form, I’ll be adding the following fields: name, email, radio buttons, dropdown fields to make the form more functional.
You can configure the form settings on the right sidebar, edit the label, and rename the placeholder.
Next, I’m going to add some multiple-choice questions like: “Will you be attending the event?”, “How did you hear about the event?” using radio buttons. You can easily customize the options by clicking on the edit icon.


Additionally, you can make the form more professional by toggling the Required option for specific fields.

And you can hide some of the fields when your form loads by enabling the Hidden option.

Similarly, you can also check other features present in the form settings section and adjust them accordingly.
With Bit Form’s conditional logic feature, you can dynamically show or hide certain fields on the basis of user input. For example, in this RSVP event form, I have kept a question asking the guests whether they’ll be attending or not. If the guest selects “Yes” option, only then other fields be visible to them. Otherwise, they’ll remain hidden.
To do this simply, move to Settings > navigate to the Conditional Logics section > Tap on “Add Conditional Logic” button. Now, start applying the condition.

First, select the “Only on Field Input” option.
Next, choose the form field from the dropdown menu on which you want to apply the conditional logic. Then set the logic (change, equal, not equal, is null, not null) and the value you want to match. You can select the value by clicking on the three-dot icon, there you’ll see the options.

Once you’re done setting the If condition, now you need to set Then condition. And for that follow the previous steps, select the field you want to control from the dropdown menu. After selection, set the action you want to perform on these fields for example, hide, disable, show, readonly, enable, and more.

And it’s done. Wait, don’t forget to press on update button (top right side) to save the changes.
So, now whenever any person says they’re attending the event, only then all other options of the form will be visible.
You can directly add it to any existing page or create a new page. Then copy the form shortcode and paste it in the ShortCode Block. Easy right? Let’s do it.


After successfully adding the RSVP form to your website, come let’s check how the form works.
This is how the form looks.
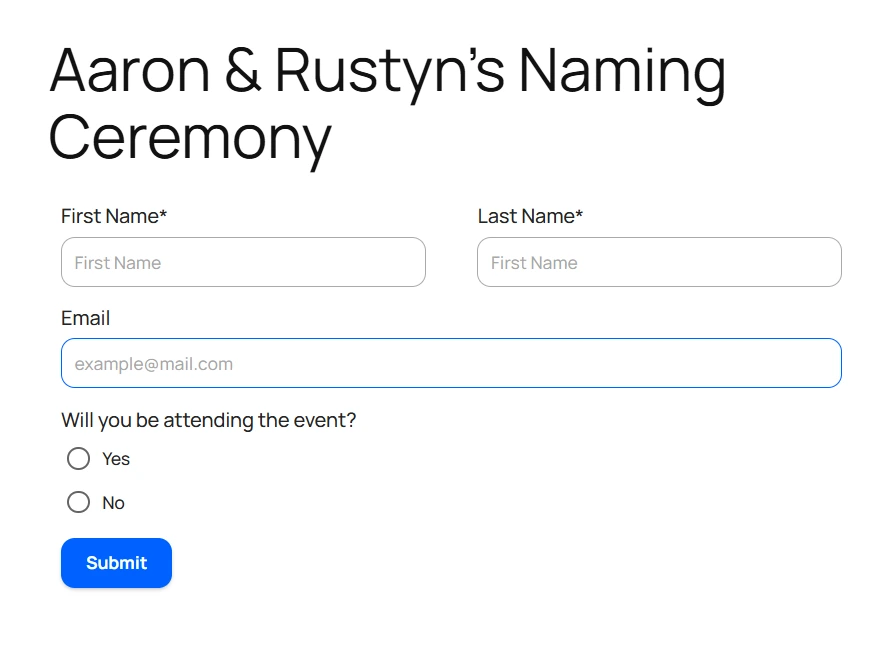
Once you select the Yes option, you can see other options automatically appear. Otherwise, they remain hidden.


Planning an event is exciting, but managing the guest list, recording individual food can be a hectic job. That’s why a dynamic event RSVP form is quite helpful.
Whenever it comes to creating any form, Bit Form is hands down an exceptional choice. Its easy-to-use drag-and-drop interface and powerful conditional logic enable you to customize your RSVP form in minutes. No coding required and all at an affordable price.
So, start using Bit Form today and make your event management smoother