
Create a WordPress File Upload Form for Free: Beginner’s Guide
Wondering how users can upload resumes, screenshots, documents, or project files through your WordPress form?
A simple file upload field allows them to send everything with the form submission. You don’t have to collect files separately by email. And if you’re a WordPress user, then it’s even easier. You’ll just need the right form plugin.
See the frustration: Someone fills all the basic fields of your contact form, but finds no way to attach a screenshot of their issue. The form does not have a file upload field, so they have to mail it. This breaks the flow, and the user experiences discomfort. It becomes a hassle for both the user and the admin to manage all the form data and the inbox at the same time.
So, whether you’re collecting images or any kind of documents, adding a file upload option is mandatory. Today, we’ll see how to create a WordPress file upload form, absolutely free of cost.
TL;DR:
With a WordPress file upload form, users can send files directly through your form, removing the need for follow-up emails and manual tracking. Set it up in a few clear steps:
- Install and activate Bit Form from your WordPress dashboard.
- Create a new form using a template or from scratch.
- Add a file upload field to your form.
- Configure various settings like file types, size limits, and multiple uploads.
- Customize the form design if needed.
- Connect cloud storage like Dropbox or Google Drive to manage files.
- Enable the integration from Conditional Logic to trigger file upload
- Test the form to confirm files are stored correctly
Why Add a File Upload Field in WordPress Forms?
Not all forms require a file upload field. In most cases, text inputs are enough to collect basic information. However, there are certain situations when uploading files makes the process faster and easier. Let’s see some real scenarios when you need a file upload form:
- While resolving support tickets, attaching a screenshot of the error makes it easier for the team to understand and solve the issue.
- In the job application forms, interviewers need the candidates’ resumes and portfolios to evaluate them.
- During online admission, students are often asked to submit transcripts, recommendation letters, and identification documents.
- For legal forms where the client may need to upload contracts or other legal documents.
- In medical forms, patients can attach their prescriptions, reports, and other necessary documents.
- In contest forms, for example, in a photography contest form, the participants need to submit their clicked pictures.
If there were no file upload field, users would have submitted their files through email. Eventually, emails start to pile up one after another. You end up handling form data in one place and files in another.
That means constantly switching between your WordPress dashboard and your inbox just to match submissions with their files. This back-and-forth will slow everything down and increase the chance of missing important information.
How to Create a WordPress Form with File Upload?
Now that you have seen in which forms file upload options are useful. Next comes the part that usually feels confusing at first: creating one and setting it up properly without breaking the flow of your form.
The good thing is, there are easy drag-and-drop form builders like Bit Form in WordPress. With this plugin, building a WordPress file upload form is easier than you think.
And the best part? Bit Form includes a file upload field in the free version. Also, the plugin comes with 50+ form fields and various free features with which you can create unlimited forms like multi step forms, conditional logic forms, conversational forms, and more.
Now, let’s build the file upload form step by step
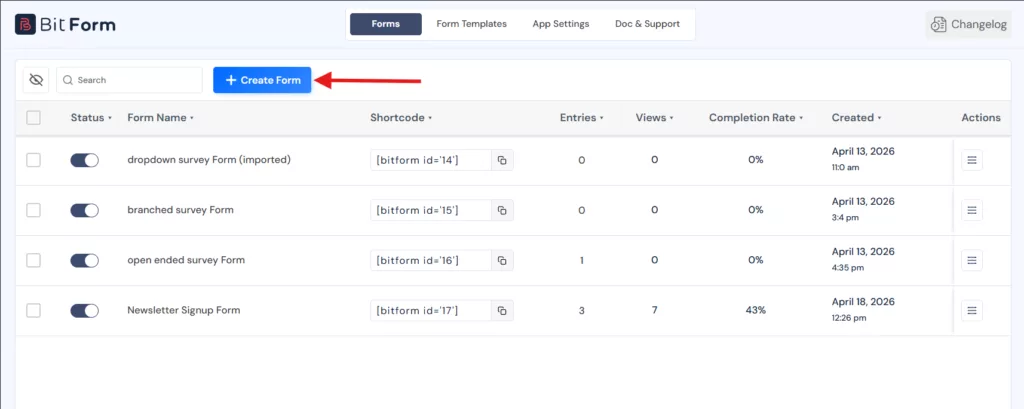
Step 1: Install and Activate Bit Form
If you haven’t installed Bit Form yet, go to your WordPress dashboard.
You can follow the usual method: Navigate to Plugins → Add New→Search for Bit Form and install and activate it. Or, simply download the Bit Form file from the website.
Once activated, you will see Bit Form in your dashboard.
Step 2: Create a New Form with File Upload
Now, click on “+Create Form”. You will see multiple options to either start from scratch or use a pre-built template.
For this guide, I’ll be using a simple contact form template.
You can also rename the form based on its purpose. This is a good practice when you are managing multiple forms.
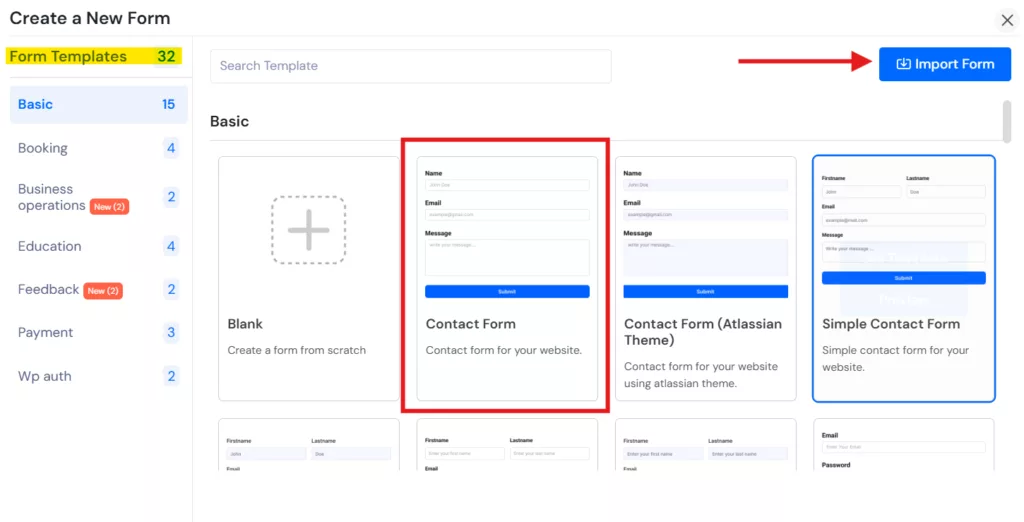
The template already includes basic fields like:
- Name
- Message
Now you need to add a file upload option.

After adding, the next step is to configure the field settings.
Step 3: Configure file upload field settings
Go to the file upload field’s settings panel.
Let’s start with Basic Settings
- Add a clear label so users understand what to upload
- Make the field required if the file is mandatory
- Add a short helper text if needed

You can also allow users to upload:
- Multiple files
- Different file types depending on your use case
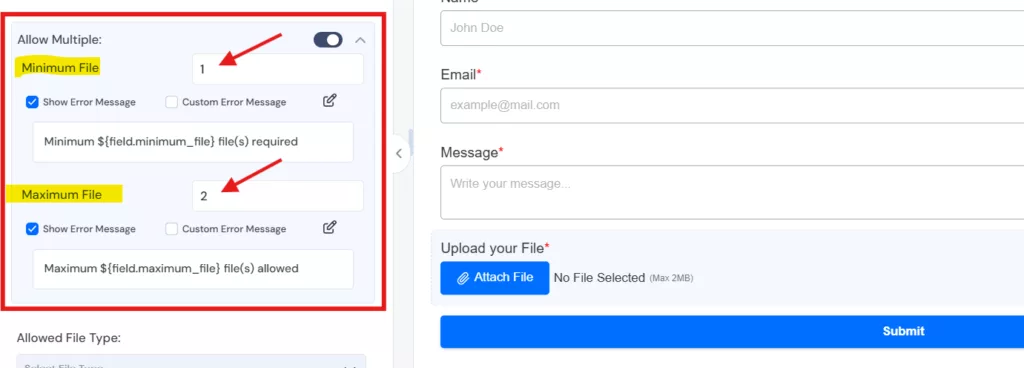
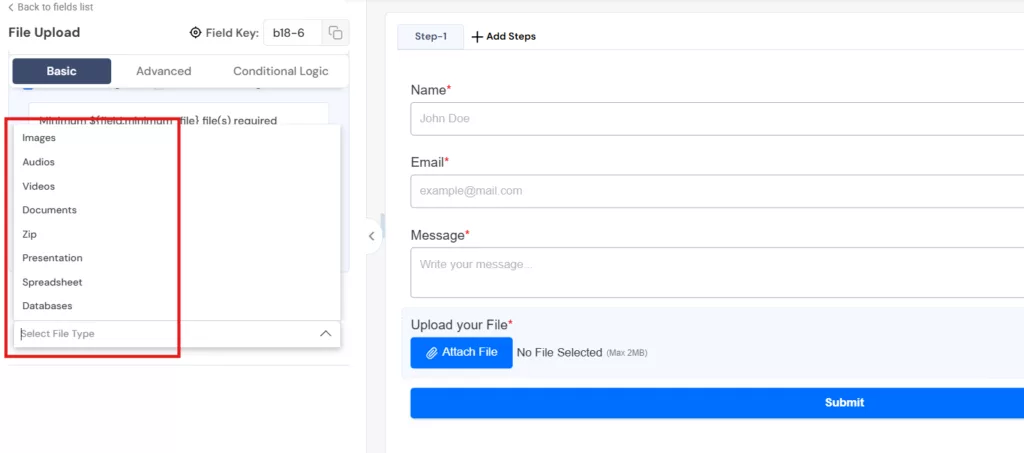
These are your core file upload options.
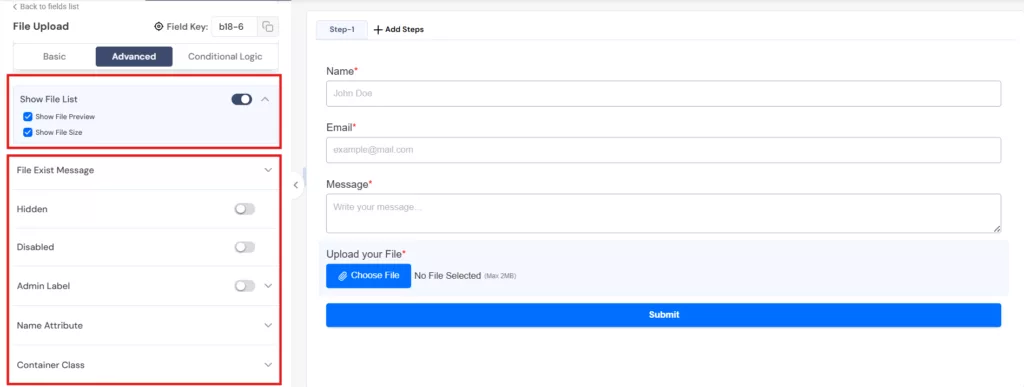
Step 4: Next, move to Advanced Settings
Here you can:
- Customize the upload button text
- Add icons for better visual clarity
- Show file selection status

You can also enable file preview or list view. Other than that, there were many helpful features too. These options help users understand what they uploaded before submitting the form. It reduces mistakes and improves the overall user experience.
After finishing the setup, don’t forget to hit the “Update” button at the top right corner.
At this stage, your WordPress form with file upload is fully functional.
Step 5: Style your Form
Once the file upload field is ready, you can adjust the form design from the Style tab. You can style your file upload form as you want with Bit Form’s style editor feature.
Just like I did, move to the “Style” tab. Here, you can quickly go for the Theme Quick Tweaks panel to adjust background colors, fonts, field sizes, and other elements. Or, you can also customize the global elements or design the form elements individually. The changes appear live, so it is easy to match the form with your site design.

How to Manage Uploaded Files With Cloud Storage Options
Now you must be wondering where the uploaded files go? Well, by default, they are stored on your server. It works fine for small forms, but the problem arises when you have to manage larger files and when the submissions increase.
What happens when files are stored on your server:
- They use up your hosting space quickly
- Large files can slow down your website
- Managing files becomes messy over time
- Backup and recovery become more critical
A better way to manage files
Instead of relying only on your server, you can send uploaded files directly to cloud storage.
Bit Form supports popular cloud storage integrations like Dropbox and Google Drive. For this example, we’ll use Dropbox.
Dropbox integration is available in the free version, so you can send uploaded files to Dropbox without spending a penny. To set this up, follow the steps below:
Note: Bit Form integrates with 50+ platforms and services, and all of them are free.
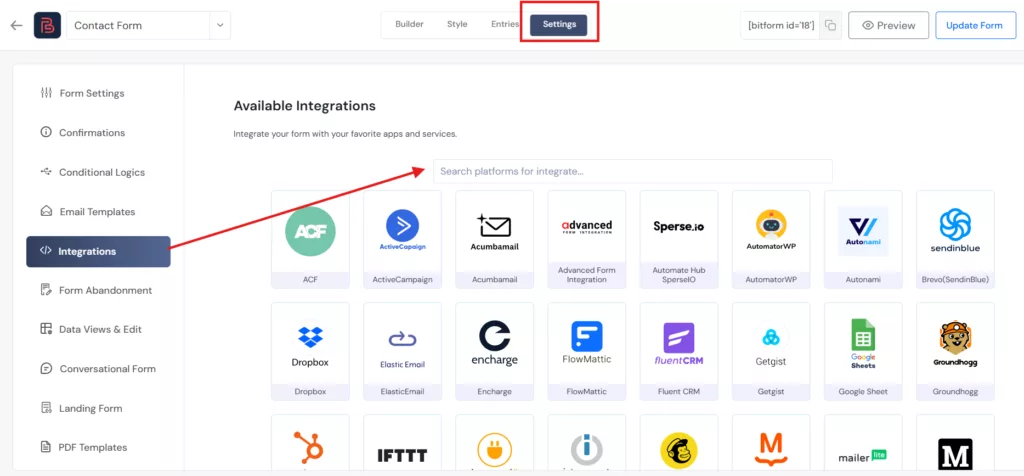
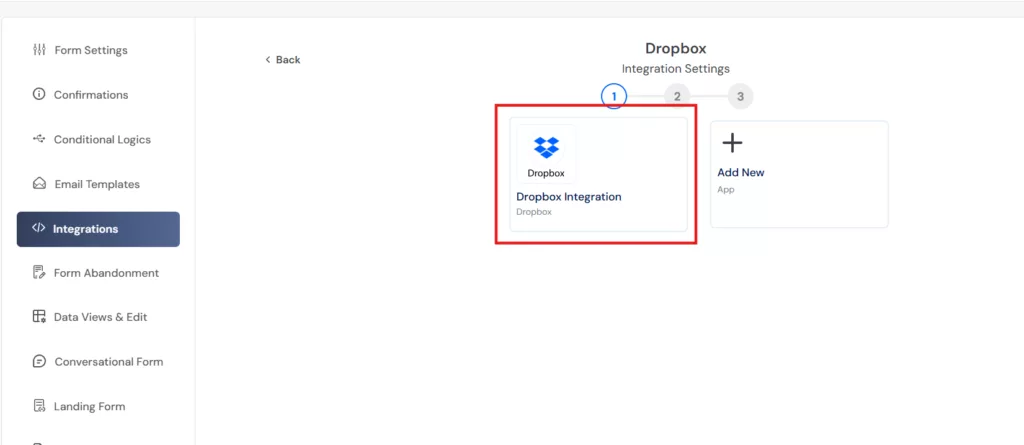
Step 1: Go to Integrations
So move to the “Settings” panel from the dashboard. Then go to “Integrations” from the left menu.
Then search for Dropbox.
Step 2: Connect Dropbox
Once the app appears, click on it, and an authorization window will show up. To connect your Dropbox account, first authorize the Dropbox app with api key, secret, and access code.
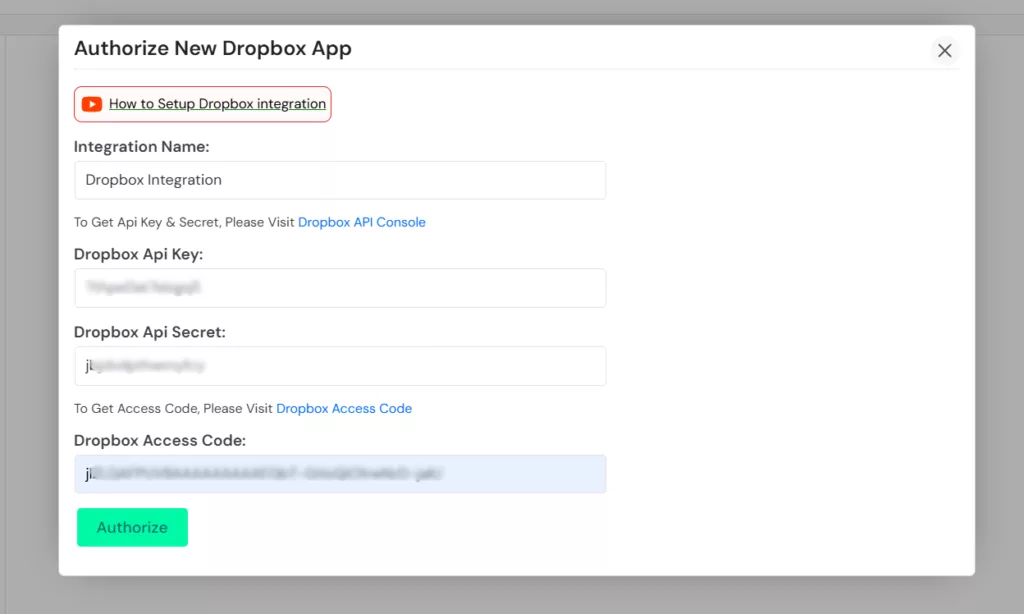
Once you complete authorization, the integration becomes active.
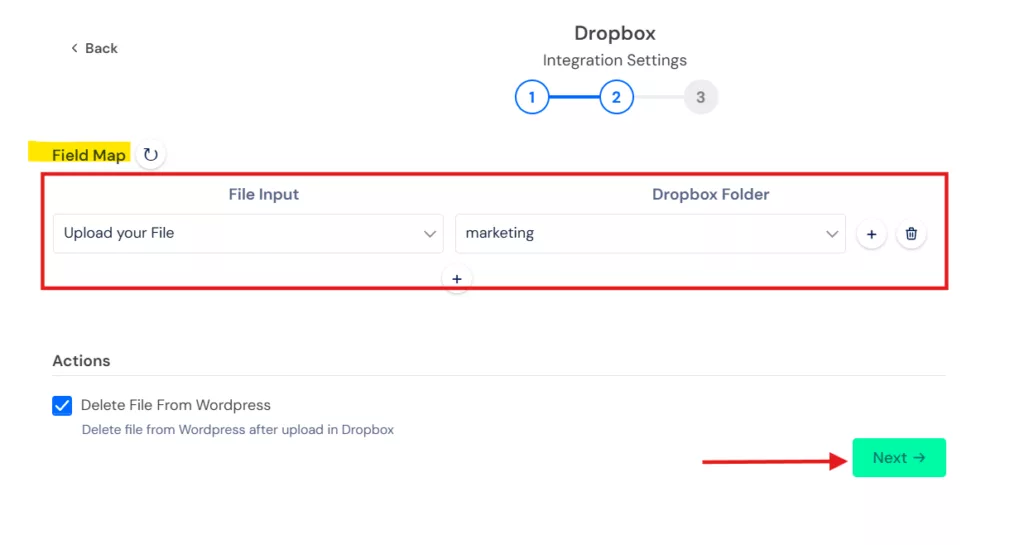
Step 3: Map File Upload Field
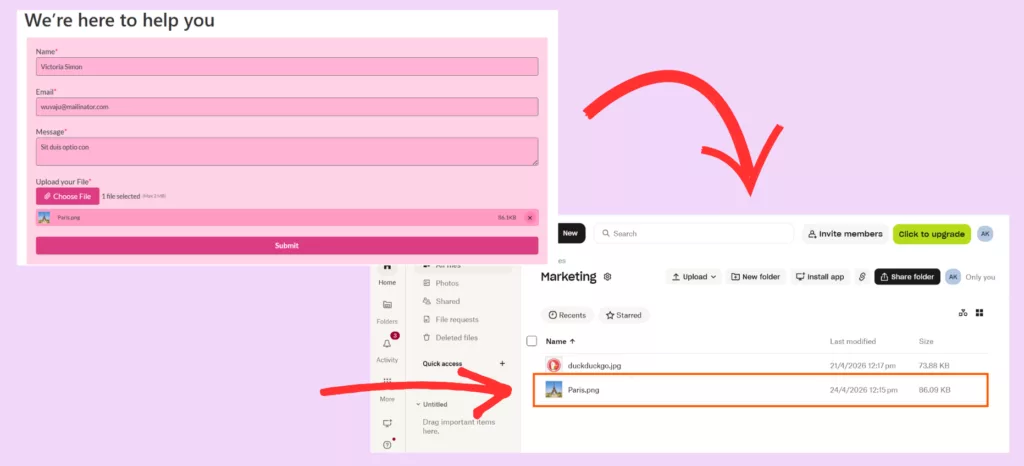
After connecting Dropbox, as you can see in the picture, there are just two more steps left.
In the second step, you need to map the file input field with the dropbox folder so that the files are sent to the correct location.
There is also an option to remove files from your WordPress server after they are uploaded to Dropbox. Enable this if you want to keep your server clean.
Click Next, then finish the setup.
Step 4: Save the Integration
Click on “Finish & Save,” and your cloud storage integration is done!

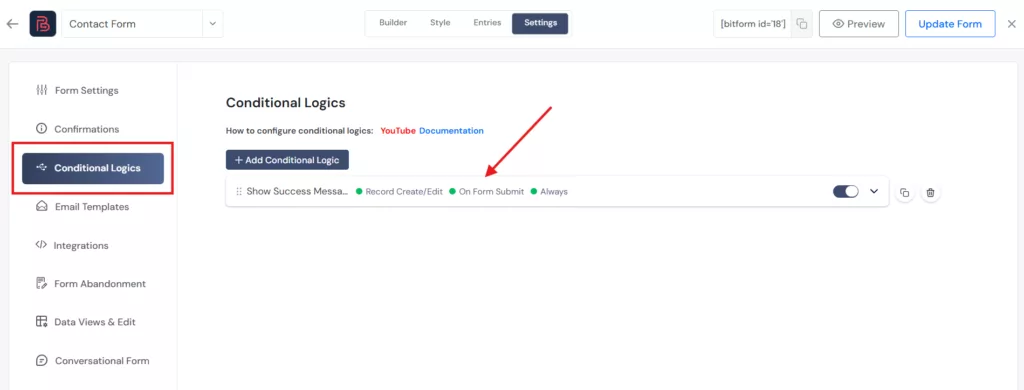
Step 5: Set the Trigger for File Upload
After connecting your Dropbox account, you need to tell the form when to send files to Dropbox.
Go to the Conditional Logic settings. You will see a default condition called Success Message. Click on it and keep the existing conditions as they are.
Now scroll down to Additional Settings. From here, select the Dropbox integration you just created. This links the form submission with your cloud storage.
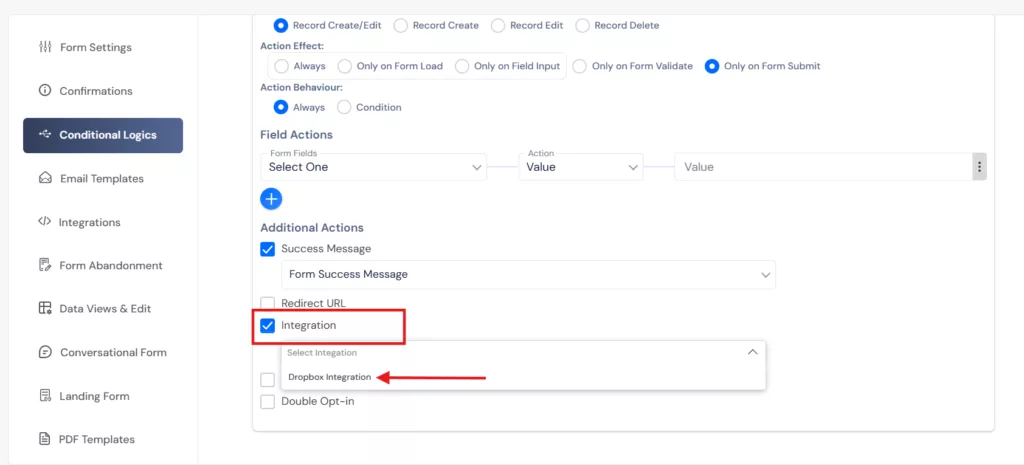
Save the settings once done. Now test your form: submit a file through it and check your selected Dropbox folder. It should be working perfectly.
How to Keep Your File Upload Form Secure Without Breaking User Experience
Adding a form with file upload always comes with one concern: What if someone uploads something harmful? But with some smart decisions, the problems can be tackled faster.
Most issues happen when forms are left too open. For example, allowing any file type or unlimited size may seem flexible, but it makes your site vulnerable to attacks and slows it down.
Start with file type control. Only allow formats that you actually need. For example, use PDF or DOCX format for documents, and JPG or PNG format for images.
File size is the next thing to manage. If there is no limit, users can upload large files, which can affect your site’s performance. So set up a limit to prevent unnecessary load on your system.
Storage also plays a role in security. When files are kept only on your server, everything depends on your hosting environment. As we did in the earlier section, using cloud storage reduces that dependency and gives you better control over your files.
You should also expect spam. WordPress forms tend to attract automated submissions. A simple CAPTCHA or validation layer is usually enough to block most of it without making the form harder to use.
If you are collecting sensitive documents like contracts or medical records, you can use Bit Form’s settings to disable public entry viewing and restrict access to logged-in users only. That keeps uploaded files out of reach for anyone without an account.
Finally, keep reviewing uploads occasionally, and removing what you do not need makes your system easier to manage.
Bonus: The Advanced File Upload Field (Pro)
If you upgrade to Bit Form Pro (starts at $29/year), you get access to a more advanced file upload field that gives you more control over the upload experience.
Here is what the Advanced file upload field supports:
- Drag and Drop: Users can drag files directly from their desktop into the upload zone instead of clicking through a file browser.
- Copy and Paste: Files can be pasted directly into the field from the clipboard.
- File Reordering: Users can rearrange the order of selected files before submitting.
- Camera Capture: On mobile devices, users can take a photo directly through the form using either the front or rear camera, without leaving the page.
- Compact and Expanded Layout Options: Choose how the upload panel displays, either in a single line or an expanded view.
- File Style Customization: Control the visual appearance of the upload button, including icon-only, classic, and flat styles.
However, you do not necessarily need the Premium plan to build a standard WordPress file upload form.
Pro is worth considering if your workflow specifically needs drag-and-drop upload, mobile camera capture, or a more customized upload layout. If none of those now feel important, the free version is more than enough to build a standard WordPress form with a file upload field.
Closing Thoughts
I hope by reading so far, you are clear that collecting files in a form is not complicated. You do not need a complex setup or a paid plugin to create a basic file upload form.
Creating a form with a file upload option is simple if the form builder offers the right field and clear steps. Here, with this plugin, I’ve controlled the file types and size, customized the form, and sent the uploaded files to cloud storage like Dropbox.
So, the next time someone needs to send you a resume, a screenshot, or a document, they will not have to dig through their inbox to send an email. They can submit directly through your website.
Frequently Asked Questions
What is a file upload form?
A file upload form lets users submit files like images, PDFs, or documents along with other form data. This option is commonly used in job application forms or customer support forms where collecting resumes, screenshots, or any required documents is required.
Can users upload multiple files in one form?
Yes, users can upload multiple files in a form. Only if the form builder supports multiple uploads. You can enable this in the settings and also control how many files a user can submit at once.
Where are files stored?
By default, files are stored on your WordPress server. You can also send them to cloud storage like Google Drive or Dropbox for easier management and better reliability.
What file types can be uploaded?
You can allow common formats like DOCX, PPT, JPG, PNG, audio, videos, and Zip. Choose only the file types that match your use case to keep the form easy to complete.
What file types shouldn’t be allowed?
Avoid allowing executable or script files like .exe, .js, bat, or .php. These can be harmful and are not needed for most form submissions.
Can I limit the file size in the form?
Yes, you can set a maximum file size in the form settings. This helps prevent large uploads that could slow down your site or fill up storage.
Is a file upload form safe to use?
Yes, it is. If you set basic safety measures like restrictions on file type, size limits, and spam protection. And using cloud storage also adds an extra layer of safety.

Related Blog

How to Prevent Spam Form Submissions in WordPress

Add reCAPTCHA to WordPress Contact Form to Prevent Spam Submission