Are you trying to add reCAPTCHA to WordPress contact form? You’re not alone. Every website owner, whether it’s WordPress-based or another platform, has faced spam bot issues at some point.
So spam bots constantly roam around the internet to detect unprotected online forms. Once they find one, they quickly fill your inbox and pollute your form data with automated submissions. This way, it becomes harder for you to identify potential leads and miss real customer inquiries.
Therefore, adding Google reCAPTCHA to your WordPress forms is one of the simplest and most effective ways to stop automated spam submissions while keeping the process smooth for real users.
Indeed, this is one of the free and most widely used spam protection services so far, but the question arises, which version to choose, v2 or v3? Both have different approaches to dealing with bots, and people have mixed opinions on each. In this post, we’ll discuss both versions honestly and show how you can add Google reCAPTCHA v3 to your WordPress contact form, step by step.
TL;DR:
Adding reCAPTCHA to a WordPress contact form is easy and takes only a few clicks. Once you do it, it automatically blocks spam without disrupting real users.
How to do it:
Install Bit Form and open your contact form
Go to App Settings → CAPTCHA → reCAPTCHA v3
Get your Site Key and Secret Key from the Google reCAPTCHA Admin Console
Paste both keys into Bit Form and save
Open your form, go to Form Settings, and toggle on Enable reCAPTCHA v3
Key points to know:
reCAPTCHA v3 is invisible and the better default for contact forms. Because v2 adds friction that increases form abandonment
Start with a moderate tolerance score, then test real submissions before making the setting stricter
You can easily add reCAPTCHA v2, v3, hCaptcha, and Turnstile using Bit Form, without any add-ons.
Why Google reCAPTCHA Is Better Than Traditional CAPTCHA?
Traditional CAPTCHA was also built to stop bot submission, but it often created friction for real users. It comes in different formats, for example, you have probably seen distorted text challenges that are hard to read or confusing image puzzles that take multiple tries.
This used to irritate users and made a simple task like form submission so difficult for people. Also, it was not even enough for advanced bots.
At the present date, with the improvements in OCR, automation tools, and even human-assisted solving systems, many CAPTCHA challenges can be bypassed by these bots. This is exactly why Google reCAPTCHA performs better. It uses behavioral analysis and machine learning to detect human patterns that bots cannot easily copy.
Even users found this Google reCAPTCHA much easier than the traditional ones. They simply had to tick on the “I’m not a robot” checkbox that’s it. Only in exceptional cases, when users fail the test, an image-selection CAPTCHA appears.
However, reCAPTCHA has two versions: v2 & v3. The case mentioned just now happens with version 2. The next section breaks down the difference between Google reCAPTCHA v2 and v3 in detail.
Google reCAPTCHA v2 vs v3: Which One Should You Use?
This is one of the most common questions site owners have when setting up anti-spam protection. The answer relies on how you want your site security and user experience to be.
Before comparing both versions, let’s see how each one works in a jiffy.
Google reCAPTCHA v2 requires user interaction, which increases form abandonment. In comparison, reCAPTCHA v3 stays invisible and requires no user interaction. It detects spam bots based on user behavior and returns a threshold value between 0.0 to 1.0.
Like, if the value is closer to 1.0 usually means the visitor is more likely to be human. A score closer to 0.0 usually means the activity looks more suspicious.
The table below shows how they differ:
Característica
reCAPTCHA v2
reCAPTCHA v3
Visible to users
Sí
No
User action required
Yes (checkbox or puzzle solving)
No
Detection method
Challenge-based
Analyzes user movements silently in the background
Experiencia del usuario
Users can be irritated with extra steps
Provides smoother experience
Bot detection
Moderate, but can be bypassed by intelligent bots
Higher, behavior-based scoring, but the result depends on setup and threshold settings
Best for
Simple login forms, registration forms, etc
High-performing forms like Contact, Lead, and newsletter forms.
Risk of false positives
Bajo
Depends on threshold setting
Tasa de abandono
Más alto
Baja
How to add reCAPTCHA to WordPress Contact Form?
Adding reCAPTCHA to WordPress forms is not rocket science. You will just need a form plugin that has these anti-spam protection features to stop spam form submissions. That’s it! Just a few clicks and the protection is on.
Before you start
Before starting the configuration, there are certain prerequisites that must be met. Those are compiled below:
I’ll be using an easy form plugin like Bit Form for this guide. It supports Google reCAPTCHA v2, reCAPTCHA v3, hCAPTCHA, and Torniquete Cloudflare. This is a feature-rich WordPress plugin with 50+ field types, 30+ ready-made templates, and more exciting features all at an affordable price.
From your WordPress dashboard, go to Plugins > Añadir nuevo and search for Bit Form. Install and activate the plugin.
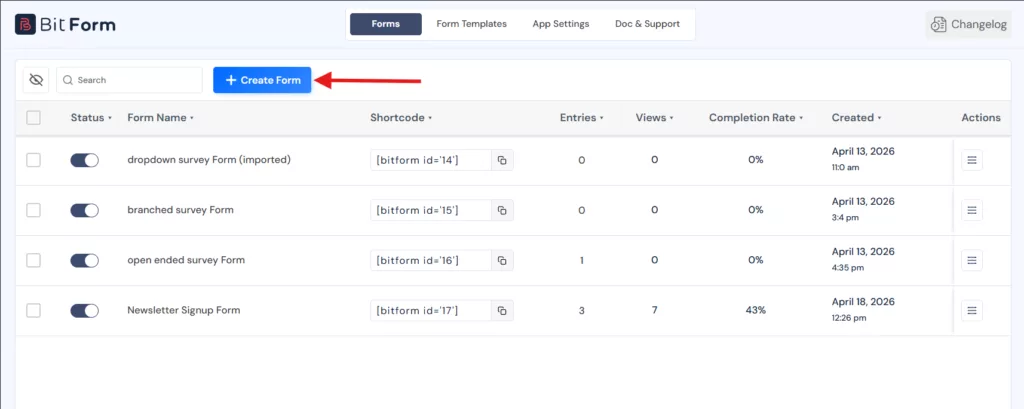
Step 01: Create Your Contact Form
Open the Bit Form dashboard. Then create a new form if you haven’t created one using the drag-and-drop builder. You can select from the library of templates or create one from scratch. I’ll go for a pre-built one.
By the way, the process of adding CAPTCHA in Bit Form is the same regardless of the form type.
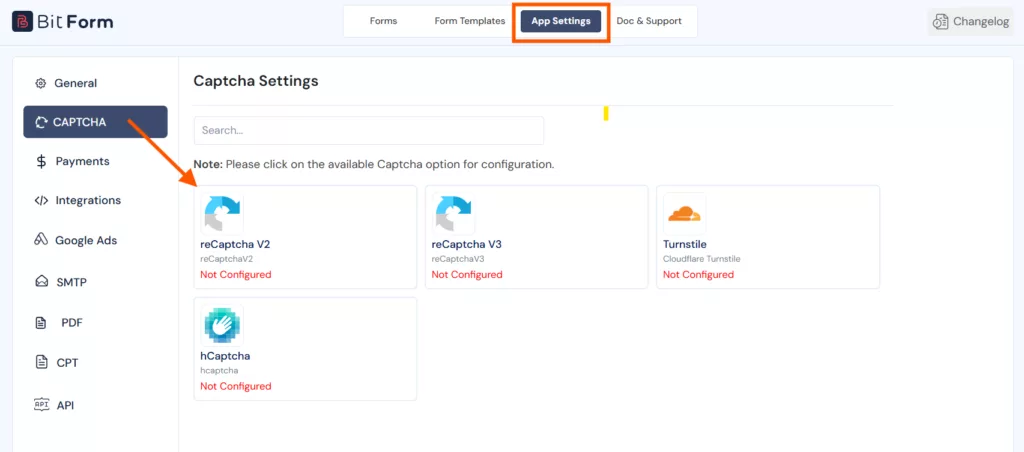
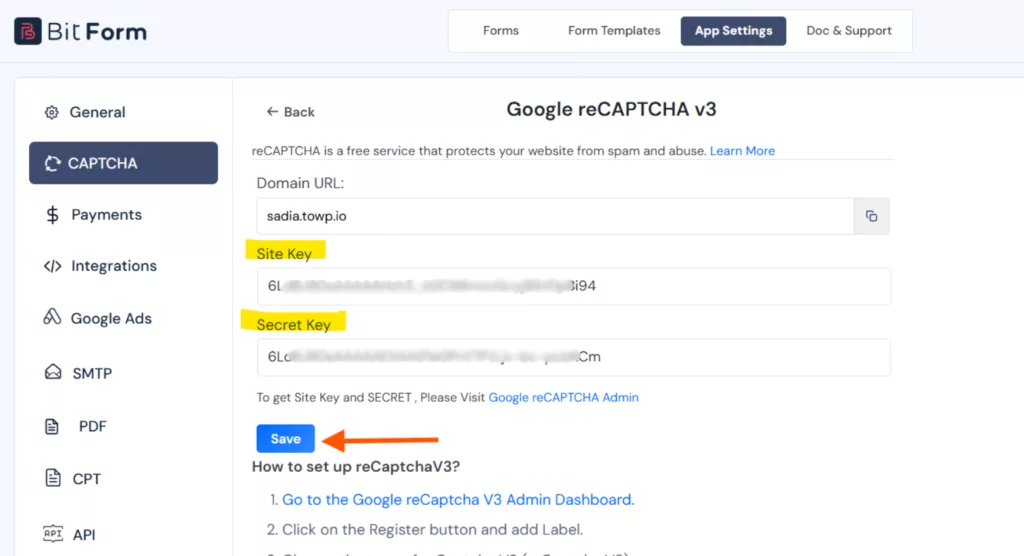
Step 02: Open the reCAPTCHA Settings in Bit Form
Go to App Settings in your Bit Form dashboard, then navigate to reCAPTCHA, and select reCAPTCHA v3.
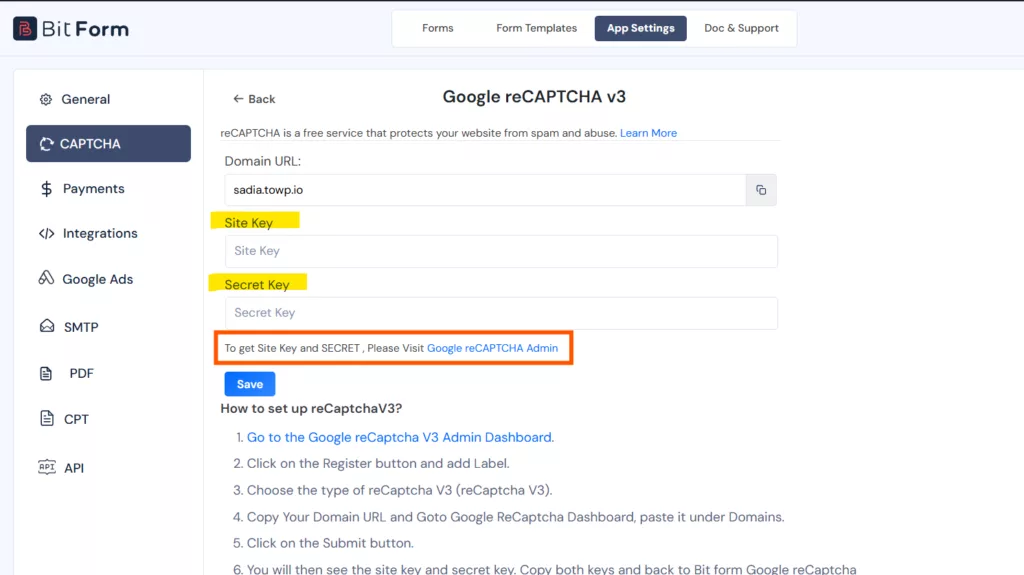
And then navigate to Bit Form reCAPTCHA v3 settings panel. Click the link to open the Google reCAPTCHA Admin console.
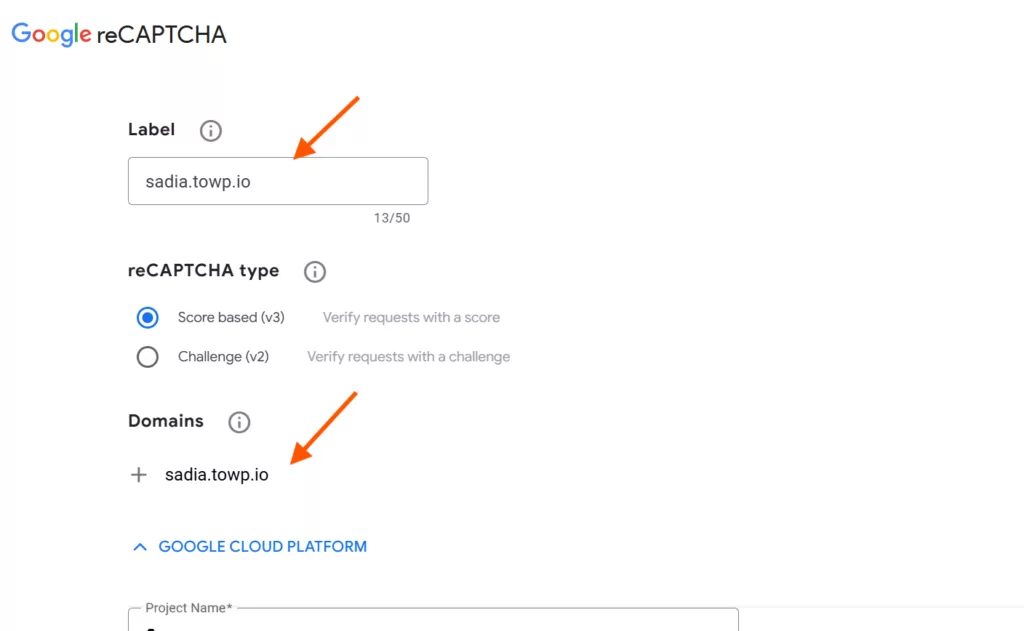
Step 03: Create Google reCAPTCHA v3 API Keys
Then click on the “+” sign and register your site. Add a label, select reCAPTCHA v3, and enter your domain name.
After registering your site, a pair of site keys and a secret is generated. Copy the generated site key and secret key.
Copy them and paste them into the corresponding fields inside Bit Form.
Step 04: Paste the Keys into Bit Form
Paste the site key and secret key into the matching fields and save the settings.
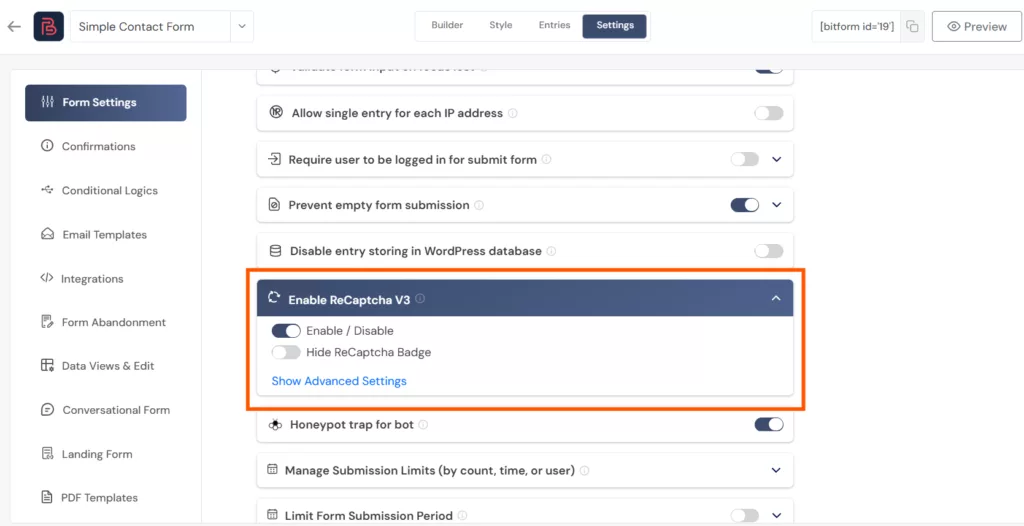
Step 05: Enable reCAPTCHA v3 from Form Settings
Open your form, go to Configuración del formulario, and toggle on Enable reCAPTCHA V3.
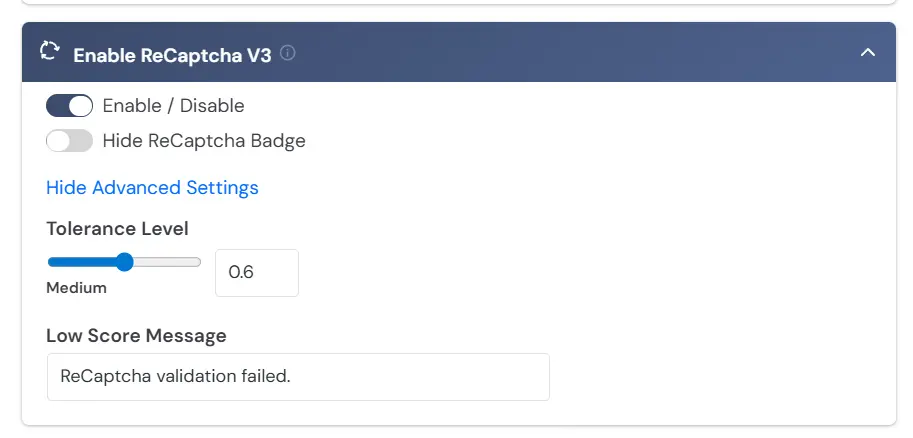
Under Advanced Settings, you can set the Tolerance Level. If the score is closer to 1.0, this means a real person submitted the form.
The reCAPTCHA v3 badge will appear in the bottom-right corner of the page where the form is embedded.
If you prefer a clean look, enable the Hide reCAPTCHA Badge toggle. This will hide the badge.
If you hide the reCAPTCHA badge, add a short notice near the form that says the site is protected by reCAPTCHA and link to Google’s Privacy Policy and Terms of Service.
Bonus: Use hCaptcha as a reCAPTCHA Alternative
While Google reCAPTCHA v3 is the most popular and excellent anti-spam service for most users, it is not the only one. hCaptcha is a strong alternative if you prefer better privacy and don’t want to send user data to Google. The setup is easy with Bit Form.
Quick Setup Steps:
From the Bit Form dashboard, move to App Settings → CAPTCHA → hCaptcha.
Add your domain, select 99.9% Passive mode, then copy the Site Key y Secret Key.
Paste both keys into Bit Form and save.
Open your form, drag the hCaptcha field into the form, then save the form.
That’s it. The hCaptcha checkbox will automatically appear on your form for visitors to tick.
💡Tip: Use reCAPTCHA v3 if you want invisible spam detection with less user friction. Choose hCaptcha if privacy is a bigger priority for your site.
So, this was the overall setup of the Google reCAPTCHA and hCaptcha anti-spam protection layers.
Both protect your WordPress contact form from spam, but is different in approach and effectiveness.
Resumen
Therefore, we now know how to add reCAPTCHA to WordPress contact form. These anti-spam protection layers are crucial as your contact forms are like an open door to the spam bots. They can use them to spread phishing links and steal data from your site.
Older CAPTCHA methods can still block basic spam, but they often create friction for real users. reCAPTCHA v3 gives contact forms a quieter way to detect suspicious submissions in the background. It can reduce spam submissions without asking every visitor to solve a challenge.
However, it’s best to remember that no spam protection you select will work perfectly since bots are becoming intelligent day by day.
FAQ
What is CAPTCHA?
CAPTCHA stands for “Completely Automated Public Turing Test to Tell Computers and Humans Apart”. It is a test carried out to differentiate between humans and bots. CAPTCHA is used by modern websites to find out where their traffic and submissions were coming from, actually.
How do CAPTCHAs work?
CAPTCHA tests whether a visitor is human or a bot by checking how they interact with a task. Traditional CAPTCHA uses challenges like text or image selection, while modern systems like reCAPTCHA analyze behavior such as mouse movement, clicks, and timing. Based on this, they decide if the submission is likely human or automated.
What are CAPTCHAs used for?
CAPTCHA is used to stop bots from misusing websites. They protect contact forms, login pages, registrations, and comment sections by blocking automated submissions and fake signups. This helps keep your data safe and prevents misuse.
How do I add reCAPTCHA to a WordPress contact form?
For that, install and activate the Bit Form plugin. Then configure settings like generate reCAPTCHA API keys from Google, then paste them into your form settings.
Why is my WordPress contact form getting spam?
Bots scan websites for unprotected forms and submit them automatically. Without spam protection, your form becomes an easy target.
How do I get Google reCAPTCHA API keys?
Go to the Google reCAPTCHA admin console, register your site, and copy the Site Key and Secret Key provided.
Is reCAPTCHA better than CAPTCHA?
Yes, reCAPTCHA is better because it does not rely only on visible challenges; it uses more advanced algorithms. It analyzes user movements and time spent on the page to detect bots. This makes it harder to bypass compared to traditional CAPTCHA, which many modern bots can solve.
Is there an alternative to reCAPTCHA?
Yes. hCaptcha and Cloudflare Turnstile are popular Google reCAPTCHA alternatives. They also offer similar spam protection, with less user interaction.
Which is better, reCAPTCHA or hCaptcha?
Google reCAPTCHA offers stronger bot detection with advanced analysis. hCaptcha focuses more on privacy and data control. For most sites, reCAPTCHA v3 is more effective, while hCaptcha suits privacy-focused setups.
Sadia is a creative technical writer. She writes about WordPress, SaaS, and automation, but makes it actually fun to read. She’s big on deep research, fresh ideas, and getting every detail right. When she’s not writing, you’ll probably find her lost in a book or binge-watching a drama series.
Nowadays, almost all modern WordPress sites contain contact forms. Yet, most of…
Consentimiento de cookies
Utilizamos cookies para mejorar su experiencia en nuestro sitio. Al utilizar nuestro sitio, usted acepta el uso de cookies.
Este sitio web utiliza cookies
Los sitios web almacenan cookies para mejorar la funcionalidad y personalizar su experiencia. Puede gestionar sus preferencias, pero bloquear algunas cookies puede afectar al rendimiento y los servicios del sitio.
Las cookies esenciales permiten funciones básicas y son necesarias para el correcto funcionamiento del sitio web.
Nombre
Descripción
Duración
Preferencias de cookies
Esta cookie se utiliza para almacenar las preferencias de consentimiento de cookies del usuario.
30 días
Esta cookie la instala Cloudflare para ayudar a gestionar el tráfico de bots y proteger el sitio web de actividades maliciosas. No recopila ni almacena ningún dato personal y se utiliza únicamente con fines de seguridad y rendimiento.
Las cookies estadísticas recopilan información de forma anónima. Esta información nos ayuda a comprender cómo utilizan los visitantes nuestro sitio web.
Google Analytics es una potente herramienta que rastrea y analiza el tráfico del sitio web para tomar decisiones de marketing fundamentadas.
ID utilizado para identificar a los usuarios durante 24 horas después de la última actividad
24 horas
_gat
Se utiliza para supervisar el número de solicitudes del servidor de Google Analytics cuando se utiliza Google Tag Manager.
1 minuto
__utmv
Contiene información personalizada establecida por el desarrollador web a través del método _setCustomVar de Google Analytics. Esta cookie se actualiza cada vez que se envían nuevos datos al servidor de Google Analytics.
2 años después de la última actividad
__utmx
Se utiliza para determinar si un usuario está incluido en una prueba A / B o Multivariante.
18 meses
_ga
ID utilizado para identificar a los usuarios
2 años
_gali
Utilizado por Google Analytics para determinar en qué enlaces de una página se hace clic.
30 segundos
No.
ID utilizado para identificar a los usuarios
2 años
No te preocupes.
Contiene información relacionada con las campañas de marketing del usuario. Se comparten con Google AdWords / Google Ads cuando las cuentas de Google Ads y Google Analytics están vinculadas.
90 días
__utma
ID utilizado para identificar usuarios y sesiones
2 años después de la última actividad
__utmt
Se utiliza para controlar el número de solicitudes del servidor de Google Analytics
10 minutos
__utmb
Se utiliza para distinguir nuevas sesiones y visitas. Esta cookie se establece cuando se carga la biblioteca javascript GA.js y no existe ninguna cookie __utmb. La cookie se actualiza cada vez que se envían datos al servidor de Google Analytics.
30 minutos después de la última actividad
__utmc
Sólo se utiliza con las versiones antiguas de Urchin de Google Analytics y no con GA.js. Se utilizaba para distinguir entre nuevas sesiones y visitas al final de una sesión.
Fin de sesión (navegador)
__utmz
Contiene información sobre la fuente de tráfico o la campaña que dirigió al usuario al sitio web. La cookie se instala cuando se carga el javascript GA.js y se actualiza cuando se envían datos al servidor de Google Anaytics.
6 meses después de la última actividad
Clarity es un servicio de análisis web que rastrea e informa sobre el tráfico de un sitio web.
Indica si MUID es transferido a ANID, una cookie usada para publicidad. Clarity no utiliza ANID y por lo tanto esto siempre se establece en 0.
Sesión
CLID
Identifica la primera vez que Clarity vio a este usuario en cualquier sitio que utilice Clarity.
12 meses
_clsk
Conecta varias páginas vistas por un usuario en una única grabación de sesión de Clarity.
12 meses
_clck
Persiste el ID de usuario de Clarity y las preferencias, únicas para que el sitio se atribuya al mismo ID de usuario.
12 meses
Las cookies de marketing se utilizan para seguir a los visitantes de los sitios web. La intención es mostrar anuncios que sean relevantes y atractivos para el usuario individual.
El píxel de Facebook es un servicio de análisis web que rastrea e informa sobre el tráfico del sitio web.