


 EN
EN  ES
ES  DE
DE  PT
PT  IT
IT  JA
JA  ID
ID How to Create a Real Estate Lead Capture Form in WordPress

Does your real estate site have a lead capture form? If not, you’re missing out on a great opportunity to turn an anonymous visitor into a paying customer.
So, what is a lead form? Well, it’s a form on your website that collects more than just a visitor’s name and email. It asks what the visitor is actually looking for: buying or selling, budget, timeline, property type. With the collected information, the agent can send appropriate deals and understand the lead better for future conversations.
Most real estate websites you’ll see still use a basic contact form: name, email, message, submit. That’s fine for someone asking about office hours. However, if you want to know which visitor is interested in buying and who is just browsing, you’ll need an effective lead generation form. Since most visitors don’t convert on the first visit anyway, with this form you can get their contact info and use it for follow-up later.
This guide covers what a real estate lead capture form should ask, the benefits of having one, and how to build one in WordPress for free, without writing any code, and how to route submissions straight to your CRM.
TL;DR
- A real estate lead capture form needs more than a name and email field. It should ask about property type, budget, timeline, and whether the visitor is buying or selling.
- Use conditional logic so buyers and sellers only see the fields that apply to them, instead of one long, boring form.
- WordPress form builders like Bit Form allow you to build this with drag-and-drop fields, show/hide logic, and built-in integrations to Google Sheets, Zoho CRM, HubSpot, and more for free.
- Route leads straight to your CRM or inbox with email notifications, so agents can follow up before a lead goes cold.
- Multi-step or conversational layouts usually convert better than one long form on a real estate page.
Why Capturing Lead Information from your Real Estate Website is Important
A contact form that just delivers a message to your inbox doesn’t actually help much beyond that one email. Capturing useful lead information helps to increase conversion and sales. Here are some benefits of lead capture forms on a real estate website:
- You can follow up with potential customers. While you’re still top of mind, you can use the information from someone who just filled out a form on your site for follow-up. Reaching out quickly, with actual context on what they’re looking for, works a lot better than waiting for them to call you back on their own.
- You can prioritize serious leads over casual ones. Budget, timeline, and financing status tell you who’s ready to move and who’s still just browsing. Without that, every inquiry gets treated the same, and agents end up spending equal time on a cash buyer ready this month and someone who will wait to even talk to a lender. You get to prioritize leads six months out from even talking to a lender.
- Supports long-term nurturing. Many prospects are not ready to buy or sell right away. Captured information lets you build a database and deliver ongoing value like market updates, matching listings, seller tips, or neighborhood insights, until they are ready. A well-nurtured list produces repeat business and referrals over time.
- You can market to what people actually want, instead of guessing. When you know a lead’s budget, property type, and area of interest, you can send them listings and updates that match their requirements.
- Improves marketing ROI and measurement. You can track which pages, ads, or tools generate the most form submissions and which leads convert into appointments or closed deals. This shows what actually works and helps you stop wasting budget on underperforming channels.
What a Real Estate Lead Capture Form Should Actually Ask
Before creating one, it is better to know what exactly you’ll ask in your real estate form. Normally, most lead generation forms fail in one of two ways: either they ask too little (just name and email, so every lead looks identical) or too much (a bunch of fields that irritate visitors, causing them to abandon halfway).
An effective lead generation form should contain:
- Name and contact details: full name, email, and a phone number field with country code support.
- Buying or selling: a simple choice field that changes what you ask next.
- Property type: single-family home, apartment, land, commercial, and so on.
- Location or area of interest: a text field or dropdown of neighborhoods or zip codes you serve.
- Budget range: a select field or a currency field, depending on how precise you want the answer to be.
- Timeline: whether they’re looking now, in a few months, or just researching.
- Financing status: pre-approved, needs a lender, or paying cash. This alone tells an agent how serious a buyer lead is.
- Optional notes field: for anything specific, like “must allow pets” or “need a quick close.”
You don’t need all of these on every form. Just for your idea, I’ve put together what information is allowed or important in this type of form. Later, you’ll also discuss best practices on building a functional lead capture form. For now, let’s move on to the most awaited portion.
How to Build a Real Estate Lead Capture Form in WordPress
If you have a WordPress site for your real estate business, then you don’t have to worry about creating forms. Because the WordPress directory has plenty of beginner-friendly form plugins. Exactly, for today I’ll be using Bit Form, an affordable form builder plugin with a drag-and-drop builder.
Besides, it comes with 50+ field types, 30+ pre-built templates, conditional logic, and free integration with popular CRM and email marketing platforms, so creating any type of form and workflows is just a matter of a few clicks.
The free version covers most of what a real estate lead form needs. Here’s how to put one together.
1. Install Bit Form and Start a New Form
Install Bit Form from the WordPress plugin directory and activate it.
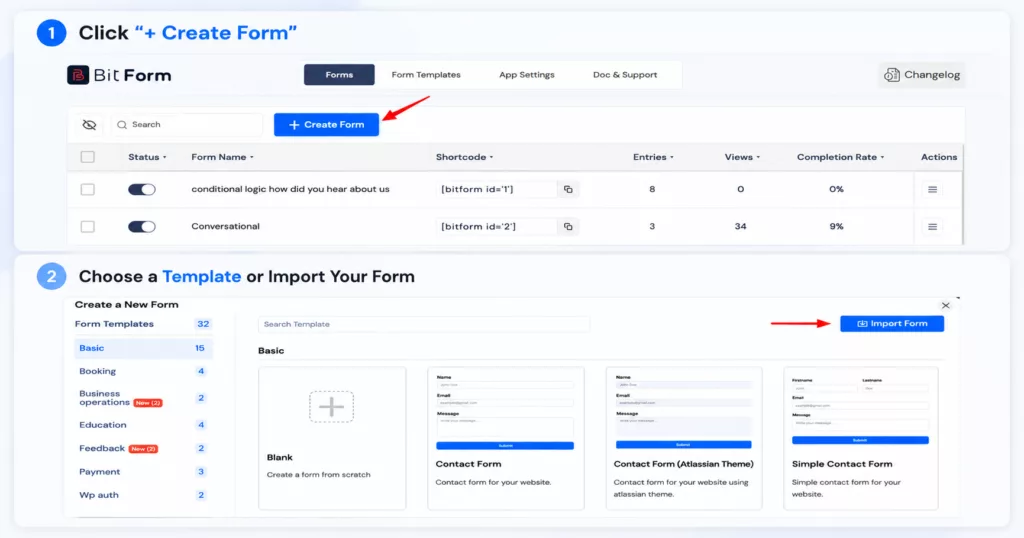
Now navigate to the Bit Form dashboard and click on “+Create form”. You can start from a blank form or select a template of your choice and adjust the fields from there, since Bit Form’s builder lets you add, remove, and rearrange fields freely.
2. Add the Fields That Match Your Lead Criteria
I’ll be creating a Realty Inquiry Form from scratch. With Bit Form’s drag-and-drop interface, you can drag in the fields from the left-side menu and configure their settings.
In this form, I’m adding contact fields, radio buttons for asking what they’re interested in (buying or selling), an additional multi-Line Text field for notes, then an agreement checkbox to ensure clients agree with the company’s terms and conditions.
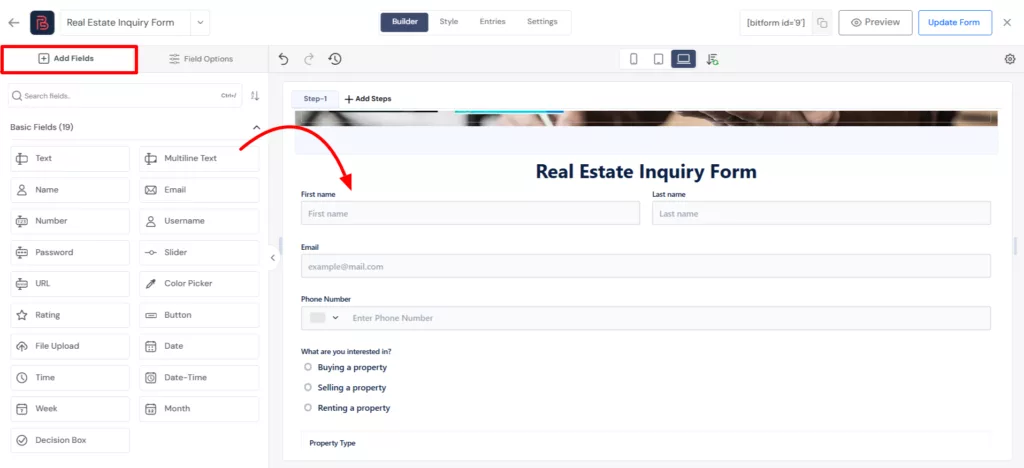
If you want document collection, such as a pre-approval letter, the File Upload field is available in the free version; you can do that too.
3. Use Conditional Logic to Split Buyers from Sellers
This is the part that turns a general form into a dynamic lead capture tool. Use Bit Form’s show/hide conditional logic feature so you can set a rule like: if someone selects “Selling” in the buyer/seller field, show property type, condition and estimated square footage instead of budget and financing questions. This keeps the form short for each individual visitor, even though the form itself covers more ground behind the scenes.
4. Break Longer Forms into Multi-Step Forms
If your lead form asks more than five or six questions, convert it to multi-step or conversational form layout instead of one long page. Multi-step forms group related questions into screens with a progress indicator. Conversational forms show one question at a time like a real-time chat, which tends to feel less like paperwork. Both are available in the free version. For example, you can follow this pattern while asking:
- Step 1: Contact information
- Step 2: Property preferences
- Step 3: Budget and timeframe
- Step 4: Additional requirements
ℹ️FYI: Bit Form Pro adds form abandonment tracking, so partially completed forms are saved, and you can see and follow up on leads who didn’t finish.
5. Set Up Email Notifications and Route the Lead
Once the fields are in place, go to the form’s Email Notification settings and set who receives a copy of each submission. Bit Form lets you build a custom email template with smart tags that pull in the submitted values automatically, so an agent gets an email that already reads like a lead summary instead of a raw form dump.
If different agents cover different areas, Bit Form Pro’s conditional email routing can send the notification to a specific inbox based on the answers, for example, routing commercial inquiries to one agent and residential ones to another.
6. Connect the Form to Your CRM
You may not want to manage every real estate inquiry inside WordPress. If your team already uses a CRM or spreadsheet, connect the form to that system.
Bit Form natively integrates with over 50 platforms (for free), including Bit CRM, Google Sheets, Zoho CRM, HubSpot, Mailchimp, and ActiveCampaign, and more.
For a CRM workflow, you have to first connect the CRM with the form.
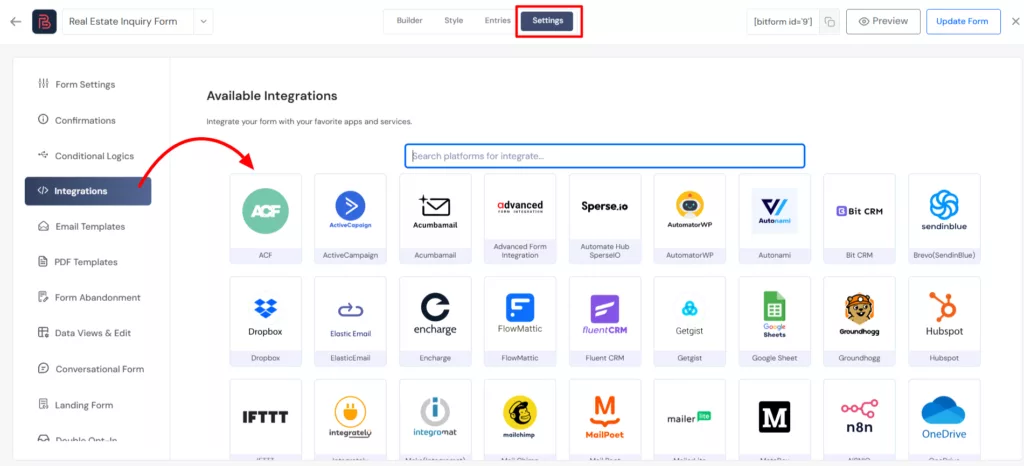
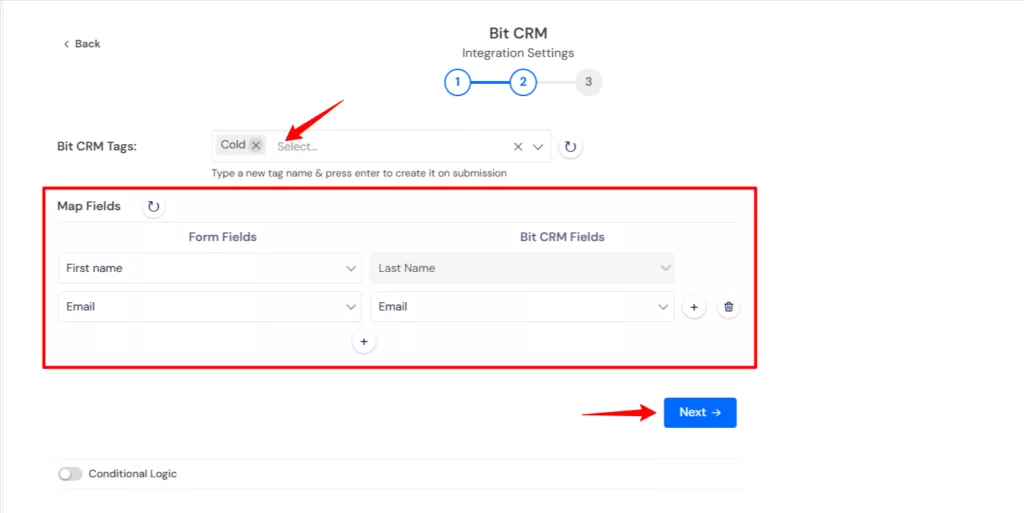
Go to the form’s settings → select Integrations → select the CRM and authorize it. Then click on Next and start mapping the form fields to the CRM’s fields, and new leads will show up there automatically after submission.
The important point is to decide where the lead should go before publishing the form.
Here, I’ve integrated my lead form with Bit CRM, a WordPress-native sales CRM from the same developer. Submitted leads land directly in Bit CRM’s Leads module, where you can convert a promising one into a contact, move it through a deal pipeline with stages you define, like new inquiry, showing scheduled, offer made, and assign follow-up tasks, calls, or meetings to a specific agent.
7. Style and Embed the Form
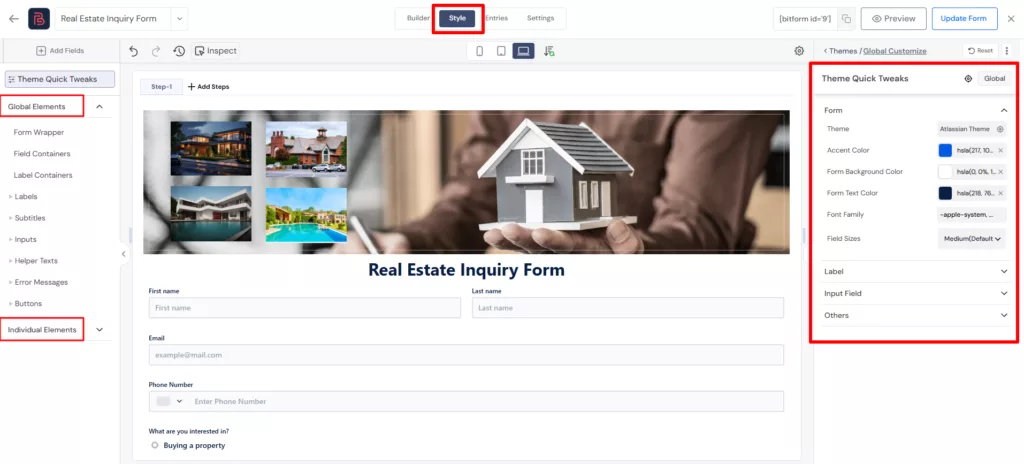
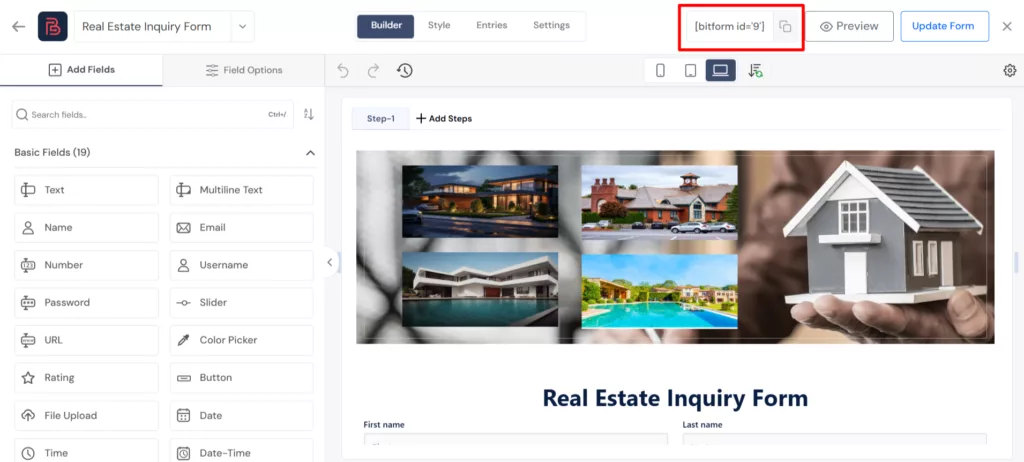
Use Bit Form’s built-in style editor to match your site’s fonts, colors, and spacing, then place the form using the Bit Form block, or a shortcode.
Where to Place Lead Forms on a Real Estate Website
Where you put the form matters almost as much as what’s in it. Place it where it is needed and will bring the most benefit. Let me show you a few placement spots that work well:
- Individual listing pages – a short form asking about that specific property, with a hidden field capturing which listing the lead came from.
- A dedicated “Get Pre-Qualified” or “Talk to an Agent” page – this is where a longer, multi-step version of the form fits.
- Neighborhood or search result pages – a simple “email me new listings like this” form with just name, email, and area.
- A standalone landing page for paid traffic – Bit Form’s Landing Form feature can create a form with its own direct URL, separate from your regular site pages, which is useful for PPC campaigns tracking a specific offer.
Adding lead capture forms to a real estate website usually works best when the form matches the visitor’s intent at that point on the page, not when the same long form is pasted onto every page of the site.
Best Practices for Creating a Strong Real Estate Capture Form
Now that you’ve built the real estate form and placed it in the correct place, you’ve completed half your job. Next, you’ve to structure the questions in a way that will make a significant difference to the user experience and will help more of them to convert.
- Ask only the questions that you need now. Every field should have a purpose. If your sales team never uses a particular piece of information, consider removing the field. A shorter form is quicker to complete than a long form, especially if the visitor is researching. Save the deeper questions for pages where the visitor has already shown intent.
- Protect your forms from bots. Real estate forms are a common spam target. Bit Form includes multiple spam protections such as Google reCAPTCHA v2 & v3, hCaptcha, and Cloudflare Turnstile in the free version, which is usually enough without adding friction for real visitors.
- Give leads clear next steps after submission. “Thanks, we’ll be in touch” doesn’t tell a lead what happens next. A specific message, or a redirect to a thank-you page with next steps, sets better expectations.
- Track where your leads come from. Capture the source of each inquiry so you can understand where your leads are coming from and give your team better context during follow-up. You can use hidden fields to store information such as the page, campaign, or other source details. Bit Form also supports Google Ads Click ID capture, which can help connect form submissions with Google Ads campaigns
- Use conditional logic to make follow-up more relevant. Without conditional logic, a potential buyer and someone who filled out a form out of curiosity land in the same inbox, with no way to tell them apart at a glance.
The Bottom Line
How efficient should a real estate business site be? It should make it easy for an interested visitor to take the next step. A well-organized lead capture form can do that without asking for every detail upfront. However, people often get worked up thinking about creating the form.
Well, in WordPress, capturing leads does not necessarily have to be a complex process. If you know why you’re building, what you’ll get from it, how you’ll nurture the leads, and most importantly, when you’re using a form builder plugin that allows you to create one for free. Then the whole process is easy.
Keep the first interaction simple, collect information you can actually use, and improve the form based on how real visitors respond.
Most Common Questions Answered
What is a real estate lead capture form?
A Real Estate Lead Capture Form is a website form that collects contact and property-related information from potential buyers, sellers, renters, or investors. It gives a real estate business a structured way to receive and follow up on inquiries.
What fields should a real estate lead generation form include?
Start with basic contact information such as name, email, and phone number. Depending on the form’s purpose, you can then ask about property type, location, budget, timeframe, and other relevant requirements.
How do I add lead capture forms to a real estate website?
If you’re a WordPress user, you can simply use any WordPress form builder to create the form first. Then add necessary fields, configure confirmations and notifications, and publish it on relevant pages.
Can leads upload documents through the form, like a pre-approval letter?
Yes. Most form builders offer a File Upload field, which allows you to add documents related to the inquiry.
Can one form work for both buyers and sellers?
Yes, using conditional logic. The visitor picks their intent first, and the form reveals only the fields relevant to that choice, so buyers and sellers never see each other’s questions.
Can I send real estate lead information to a CRM?
Yes, if your form builder is compatible with the CRM you use. You can route the data to a specific sales team and nurture your leads for conversion.
When should you use a multi-step real estate form?
A multi-step form makes sense when you need detailed information. For example, a property investment questionnaire might need:
Contact information
Investment location
Investment type
Budget
Financing preference
Expected timeframe
Investment goals
Additional requirements
Putting all of these fields into one long form can make the page feel heavier than necessary.
Breaking them into smaller multiple steps creates a clearer structure and makes it smoother to complete.


Related Blog

Form Design Best Practices for Better UX and Conversions

How to Add a “How Did You Hear About Us” Survey in WordPress

