

 ID
ID  EN
EN  ES
ES  DE
DE  PT
PT  IT
IT  JA
JA Tambahkan reCAPTCHA ke Formulir Kontak WordPress untuk Mencegah Pengiriman Spam
Are you trying to add reCAPTCHA to WordPress contact form? You’re not alone. Every website owner, whether it’s WordPress-based or another platform, has faced spam bot issues at some point.
So spam bots constantly roam around the internet to detect unprotected online forms. Once they find one, they quickly fill your inbox and pollute your form data with automated submissions. This way, it becomes harder for you to identify potential leads and miss real customer inquiries.
Therefore, adding Google reCAPTCHA to your WordPress forms is one of the simplest and most effective ways to stop automated spam submissions while keeping the process smooth for real users.
Indeed, this is one of the free and most widely used spam protection services so far, but the question arises, which version to choose, v2 or v3? Both have different approaches to dealing with bots, and people have mixed opinions on each. In this post, we’ll discuss both versions honestly and show how you can add Google reCAPTCHA v3 to your WordPress contact form, step by step.
TL;DR:
Adding reCAPTCHA to a WordPress contact form is easy and takes only a few clicks. Once you do it, it automatically blocks spam without disrupting real users.
How to do it:
- Install Bit Form and open your contact form
- Go to App Settings → CAPTCHA → reCAPTCHA v3
- Get your Site Key and Secret Key from the Google reCAPTCHA Admin Console
- Paste both keys into Bit Form and save
- Open your form, go to Form Settings, and toggle on Enable reCAPTCHA v3
Key points to know:
- reCAPTCHA v3 is invisible and the better default for contact forms. Because v2 adds friction that increases form abandonment
- Start with a moderate tolerance score, then test real submissions before making the setting stricter
- You can easily add reCAPTCHA v2, v3, hCaptcha, and Turnstile using Bit Form, without any add-ons.
Why Google reCAPTCHA Is Better Than Traditional CAPTCHA?
Traditional CAPTCHA was also built to stop bot submission, but it often created friction for real users. It comes in different formats, for example, you have probably seen distorted text challenges that are hard to read or confusing image puzzles that take multiple tries.
This used to irritate users and made a simple task like form submission so difficult for people. Also, it was not even enough for advanced bots.
At the present date, with the improvements in OCR, automation tools, and even human-assisted solving systems, many CAPTCHA challenges can be bypassed by these bots. This is exactly why Google reCAPTCHA performs better. It uses behavioral analysis and machine learning to detect human patterns that bots cannot easily copy.
Even users found this Google reCAPTCHA much easier than the traditional ones. They simply had to tick on the “Saya bukan robot” checkbox that’s it. Only in exceptional cases, when users fail the test, an image-selection CAPTCHA appears.
However, reCAPTCHA has two versions: v2 & v3. The case mentioned just now happens with version 2. The next section breaks down the difference between Google reCAPTCHA v2 and v3 in detail.
Google reCAPTCHA v2 vs v3: Which One Should You Use?
This is one of the most common questions site owners have when setting up anti-spam protection. The answer relies on how you want your site security and user experience to be.
Before comparing both versions, let’s see how each one works in a jiffy.
Google reCAPTCHA v2 requires user interaction, which increases form abandonment. In comparison, reCAPTCHA v3 stays invisible and requires no user interaction. It detects spam bots based on user behavior and returns a threshold value between 0.0 to 1.0.
Like, if the value is closer to 1.0 usually means the visitor is more likely to be human. A score closer to 0.0 usually means the activity looks more suspicious.
The table below shows how they differ:
| Feature | reCAPTCHA v2 | reCAPTCHA v3 |
| Visible to users | Ya | Tidak |
| User action required | Yes (checkbox or puzzle solving) | Tidak |
| Detection method | Challenge-based | Analyzes user movements silently in the background |
| User Experience | Users can be irritated with extra steps | Provides smoother experience |
| Bot detection | Moderate, but can be bypassed by intelligent bots | Higher, behavior-based scoring, but the result depends on setup and threshold settings |
| Best for | Simple login forms, registration forms, etc | High-performing forms like Contact, Lead, and newsletter forms. |
| Risk of false positives | Rendah | Depends on threshold setting |
| Abandonment rate | Higher | Lower |
How to add reCAPTCHA to WordPress Contact Form?
Adding reCAPTCHA to WordPress forms is not rocket science. You will just need a form plugin that has these anti-spam protection features to stop spam form submissions. That’s it! Just a few clicks and the protection is on.
Before you start
Before starting the configuration, there are certain prerequisites that must be met. Those are compiled below:
I’ll be using an easy form plugin like Bit Form for this guide. It supports Google reCAPTCHA v2, reCAPTCHA v3, hCAPTCHA, and Cloudflare Turnstile. This is a feature-rich WordPress plugin with 50+ field types, 30+ ready-made templates, and more exciting features all at an affordable price.
So, you can simply download the Bit Form file from the website, or you can follow the other way.
From your WordPress dashboard, go to Plugins > Add New and search for Bit Form. Install and activate the plugin.
Step 01: Create Your Contact Form
Open the Bit Form dashboard. Then create a new form if you haven’t created one using the drag-and-drop builder. You can select from the library of templates or create one from scratch. I’ll go for a pre-built one.
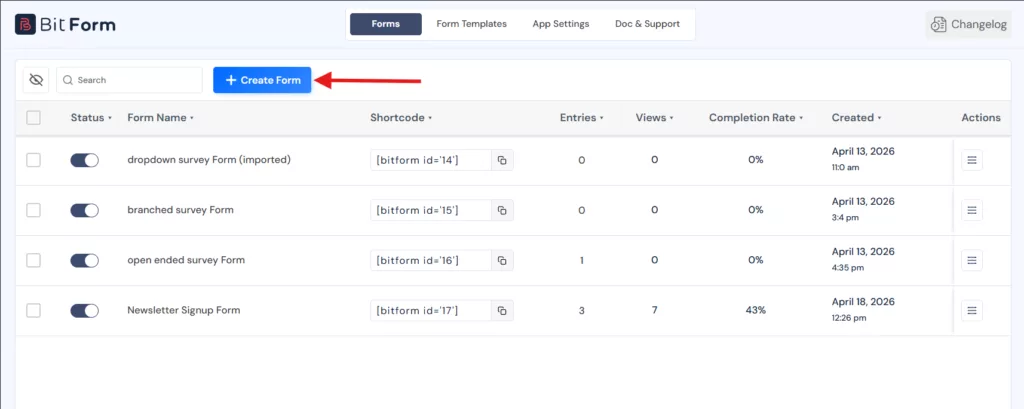
By the way, the process of adding CAPTCHA in Bit Form is the same regardless of the form type.
Step 02: Open the reCAPTCHA Settings in Bit Form
Go to App Settings in your Bit Form dashboard, then navigate to reCAPTCHA, and select reCAPTCHA v3.
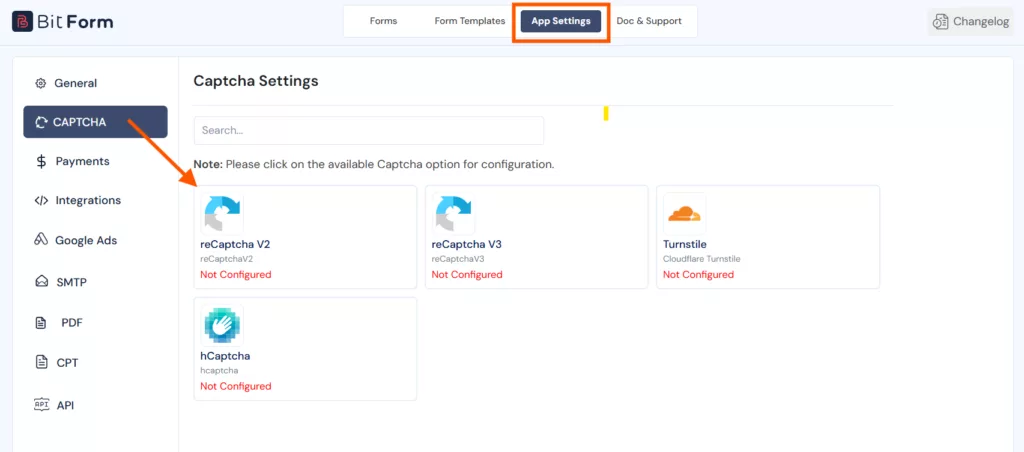
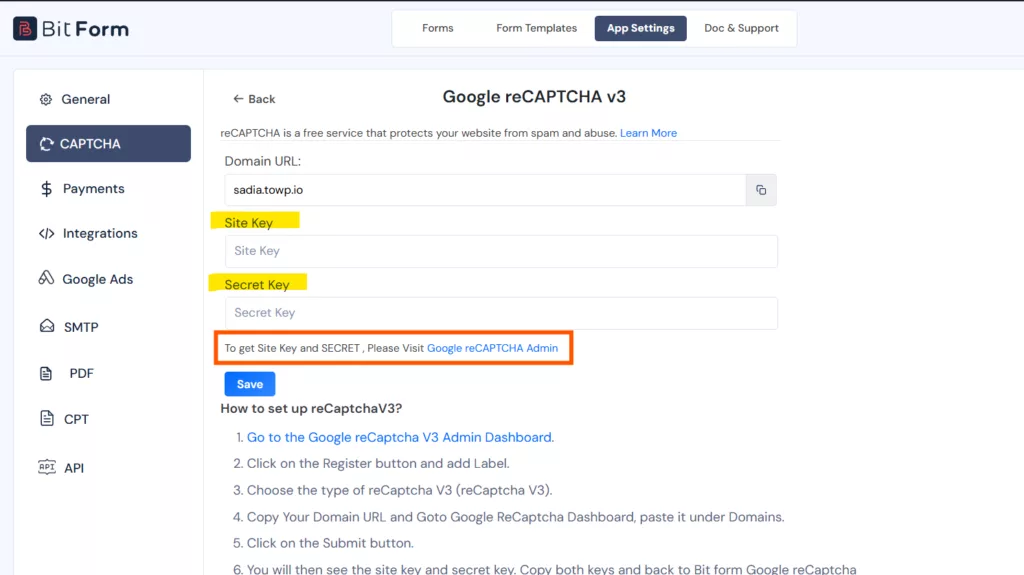
And then navigate to Bit Form reCAPTCHA v3 settings panel. Click the link to open the Konsol Admin Google reCAPTCHA.
Step 03: Create Google reCAPTCHA v3 API Keys
Then click on the “+” sign and register your site. Add a label, select reCAPTCHA v3, and enter your domain name.
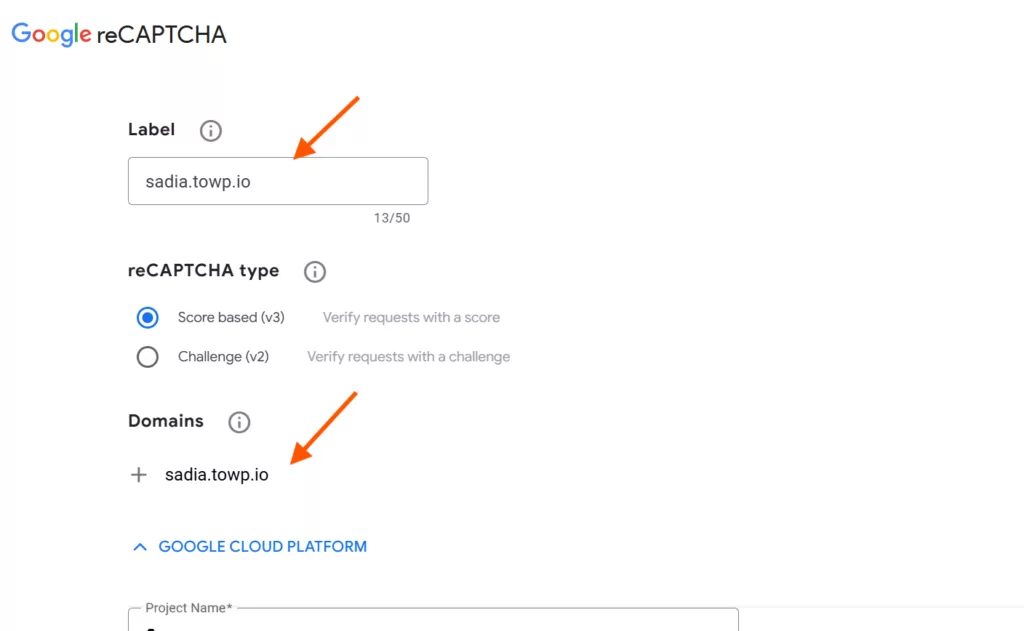
After registering your site, a pair of site keys and a secret is generated. Copy the generated site key and secret key.

Copy them and paste them into the corresponding fields inside Bit Form.
Step 04: Paste the Keys into Bit Form
Paste the site key and secret key into the matching fields and save the settings.
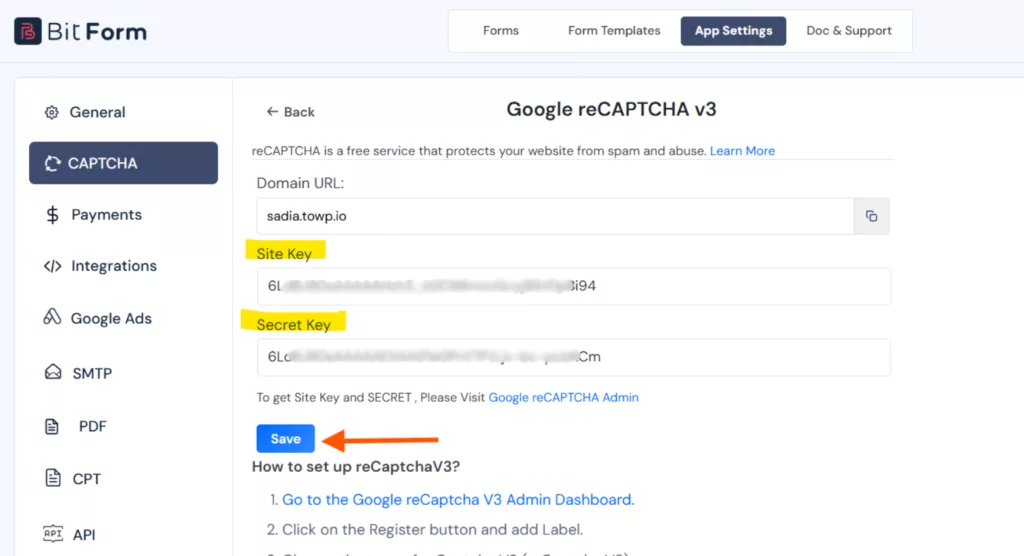
Step 05: Enable reCAPTCHA v3 from Form Settings
Buka formulir Anda, pergi ke Pengaturan Formulir, dan aktifkan Enable reCAPTCHA V3.
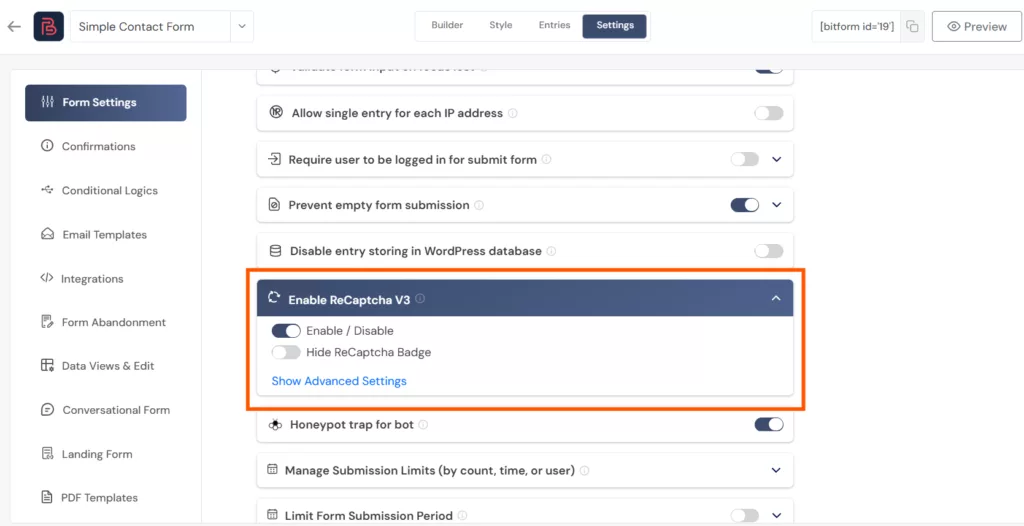
Di bawah Pengaturan Lanjutan, Anda dapat mengatur Tingkat Toleransi. If the score is closer to 1.0, this means a real person submitted the form.
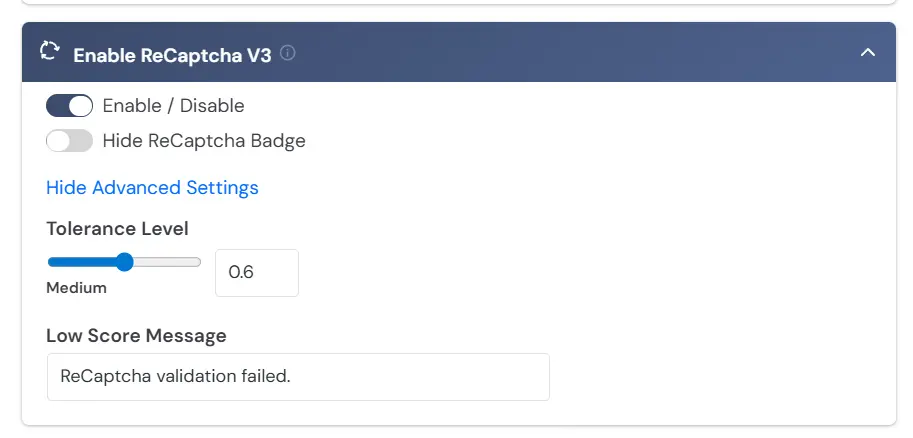
Lencana reCAPTCHA v3 akan muncul di sudut kanan bawah halaman tempat formulir disematkan.

Jika Anda menginginkan tampilan yang bersih, aktifkan Sembunyikan Lencana reCAPTCHA toggle. This will hide the badge.
If you hide the reCAPTCHA badge, add a short notice near the form that says the site is protected by reCAPTCHA and link to Google’s Privacy Policy and Terms of Service.
Bonus: Use hCaptcha as a reCAPTCHA Alternative
While Google reCAPTCHA v3 is the most popular and excellent anti-spam service for most users, it is not the only one. hCaptcha is a strong alternative if you prefer better privacy and don’t want to send user data to Google. The setup is easy with Bit Form.
Quick Setup Steps:
- From the Bit Form dashboard, move to App Settings → CAPTCHA → hCaptcha.
- Klik tautan untuk membuka hCaptcha Admin Dashboard and register your site.
- Add your domain, select 99.9% Passive mode, then copy the Kunci Situs dan Kunci Rahasia.
- Paste both keys into Bit Form and save.
- Open your form, drag the hCaptcha field into the form, then save the form.
That’s it. The hCaptcha checkbox will automatically appear on your form for visitors to tick.
💡Tip: Use reCAPTCHA v3 if you want invisible spam detection with less user friction. Choose hCaptcha if privacy is a bigger priority for your site.
So, this was the overall setup of the Google reCAPTCHA and hCaptcha anti-spam protection layers.
Both protect your WordPress contact form from spam, but is different in approach and effectiveness.
Selesaikan
Therefore, we now know how to add reCAPTCHA to WordPress contact form. These anti-spam protection layers are crucial as your contact forms are like an open door to the spam bots. They can use them to spread phishing links and steal data from your site.
Older CAPTCHA methods can still block basic spam, but they often create friction for real users. reCAPTCHA v3 gives contact forms a quieter way to detect suspicious submissions in the background. It can reduce spam submissions without asking every visitor to solve a challenge.
However, it’s best to remember that no spam protection you select will work perfectly since bots are becoming intelligent day by day.
FAQ
CAPTCHA adalah tes yang digunakan untuk membedakan manusia dari program komputer otomatis.
CAPTCHA adalah singkatan dari “Completely Automated Public Turing Test to Tell Computers and Humans Apart” (Uji Turing Publik yang Sepenuhnya Otomatis untuk Membedakan Komputer dan Manusia). Ini adalah tes yang dilakukan untuk membedakan antara manusia dan bot. CAPTCHA sebenarnya digunakan oleh situs web modern untuk mengetahui dari mana lalu lintas dan pengiriman mereka berasal.
Bagaimana CAPTCHA bekerja?
CAPTCHA menguji apakah pengunjung adalah manusia atau bot dengan memeriksa bagaimana mereka berinteraksi dengan sebuah tugas. CAPTCHA tradisional menggunakan tantangan seperti pemilihan teks atau gambar, sementara sistem modern seperti reCAPTCHA menganalisis perilaku seperti gerakan mouse, klik, dan waktu. Berdasarkan hal ini, mereka memutuskan apakah kiriman tersebut kemungkinan besar berasal dari manusia atau otomatis.
CAPTCHA digunakan untuk membedakan antara pengguna manusia dan bot otomatis.
CAPTCHA digunakan untuk menghentikan bot menyalahgunakan situs web. CAPTCHA melindungi formulir kontak, halaman login, pendaftaran, dan bagian komentar dengan memblokir pengiriman otomatis dan pendaftaran palsu. Hal ini membantu menjaga data Anda tetap aman dan mencegah penyalahgunaan.
Bagaimana cara menambahkan reCAPTCHA ke formulir kontak WordPress?
Untuk itu, pasang dan aktifkan plugin Bit Form. Selanjutnya, atur pengaturan seperti membuat kunci API reCAPTCHA dari Google, lalu tempelkan kunci tersebut ke pengaturan formulir Anda.
Mengapa formulir kontak WordPress saya mendapatkan spam?
Bot memindai situs web untuk formulir yang tidak terlindungi dan mengirimkannya secara otomatis. Tanpa perlindungan spam, formulir Anda menjadi sasaran empuk.
Bagaimana cara mendapatkan kunci API Google reCAPTCHA?
Buka konsol admin Google reCAPTCHA, daftarkan situs Anda, dan salin Kunci Situs serta Kunci Rahasia yang diberikan.
Apakah reCAPTCHA lebih baik daripada CAPTCHA?
Ya, reCAPTCHA lebih baik karena tidak hanya mengandalkan tantangan yang terlihat; ia menggunakan algoritma yang lebih canggih. Ia menganalisis gerakan pengguna dan waktu yang dihabiskan di halaman untuk mendeteksi bot. Ini membuatnya lebih sulit untuk dilewati dibandingkan dengan CAPTCHA tradisional, yang dapat dipecahkan oleh banyak bot modern.
Apakah ada alternatif untuk reCAPTCHA?
Ya. hCaptcha dan Cloudflare Turnstile adalah alternatif reCAPTCHA Google yang populer. Keduanya juga menawarkan perlindungan spam yang serupa, dengan interaksi pengguna yang lebih sedikit.
Mana yang lebih baik, reCAPTCHA atau hCaptcha?
Google reCAPTCHA menawarkan deteksi bot yang lebih kuat dengan analisis lanjutan. hCaptcha lebih fokus pada privasi dan kontrol data. Untuk sebagian besar situs, reCAPTCHA v3 lebih efektif, sedangkan hCaptcha cocok untuk pengaturan yang berfokus pada privasi.

Blog Terkait

Cara Menambahkan Survei “Bagaimana Anda Mendengar Tentang Kami” di WordPress

Cara Mencegah Pengiriman Formulir Spam di WordPress