


 IT
IT  EN
EN  ES
ES  DE
DE  PT
PT  JA
JA  ID
ID How to Let Users Edit Their Own Form Submissions in WordPress

When users need to correct a submitted form, the usual options are frustrating: submit the form again, contact the site owner, or ask an admin to update the entry manually. That creates duplicate submissions, extra support work, and outdated data.
With Bit Form, you can avoid that. The Data Views & Edit feature lets logged-in users view their own submissions and edit them directly from the WordPress front end, without giving them access to wp-admin.
You can also control exactly who can view or edit entries, so users only manage the submissions that belong to them.
This is useful for customer support forms, applications, registrations, member profiles, account details, and any form where submitted information may need to change later.
In this guide, I’ll show you how to set up the full front-end editing workflow in Bit Form using a Customer Support Form example.
If you are new to the current interface, you can also see what changed in Bit Form V3.
In sintesi
To let users edit their own form submissions from the WordPress front end with Bit Form:
- Require users to log in before submitting.
- Aprire Settings → Data Views & Edit.
- Allow users to view and edit their own entries.
- Keep access to other users’ entries restricted.
- Create a Data View and choose the fields to display.
- Enable the Edit Button.
- Add the original form and Data View shortcode to the same page.
- Publish the page and test the editing workflow with a normal user account.
What You Need Before Setting This Up
For this particular workflow, you need:
- Bit Form Pro
- A form that stores submissions in WordPress
- WordPress user accounts for the people who will edit entries
- A front-end page containing the original form and Data View
- Optional: a separate edit page if you want editing to happen on another page
Data Views & Edit is a Pro feature. You can check the current feature differences on the Bit Form Free vs Pro page.
Also make sure Disable entry storing in WordPress database is not enabled. Bit Form needs the saved entry if you want that submission to be available later for front-end editing.
Nota: Front-end entry editing is designed around logged-in users. If users need to edit their own submissions later, I recommend requiring login before the original submission so the entry can be associated with the correct WordPress user.
How to Let Users Edit Their Own Form Submissions From the Front End
Before starting the steps, make sure Bit Form is installed and activated on your WordPress site. If you are new to Bit Form, follow the installation and activation guide first.
You also need an existing form to work with. If you have not created one yet, see the guide to creating your first form with Bit Form, then return here to enable front-end submission editing.
Step 01: Require Users to Log In Before Submitting
Apri Customer Support Form, then go to: Settings → Form Settings
Find: Richiedi all'utente di effettuare l'accesso per inviare il modulo
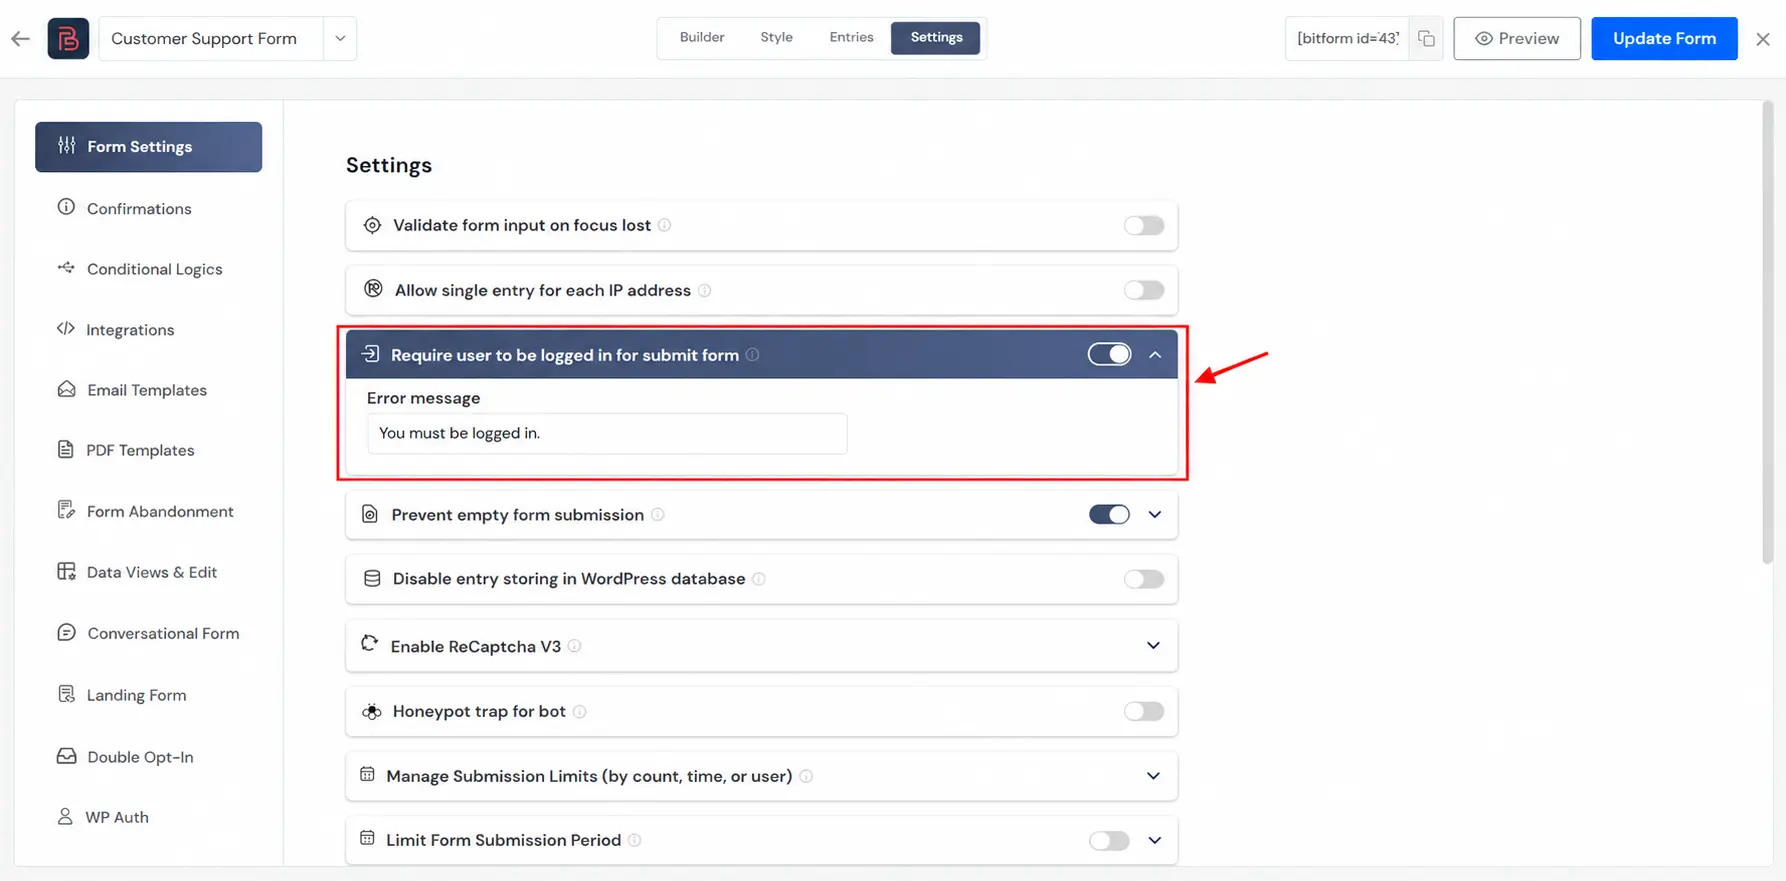
Enable it. This is important for this workflow because Bit Form needs to distinguish one logged-in user’s submissions from another user’s submissions.
You can also customize the error message. For example: Please log in to submit or update your support request.
Then click Update Form.
Nota: Keep Disable entry storing in WordPress database turned off. The submission must remain stored if users need to view and edit it later.
Step 02: Allow Users to View and Edit Only Their Own Entries
Go to: Settings → Data Views & Edit
Sotto Views And Edit Access, enable: Prevent Public View of Entries
Then set:
- Allow Roles to view own entries: Selezionare All Logged In Users or the specific roles you want to allow.
- Allow Roles to view Other’s entries: Leave empty for normal users.
Next, enable: Allow Users to Edit Form Entries
Then set:
- Allow Roles to edit own entries: Selezionare All Logged In Users or the required roles.
- Allow Roles to edit Other’s entries: Leave empty for normal users.

For this Customer Support Form, the recommended permission setup is:
- View own entries: Allow
- View other users’ entries: Do not allow
- Edit own entries: Allow
- Edit other users’ entries: Do not allow
This lets each logged-in user manage their own support requests without exposing another user’s submitted data.
Nota: If only customers or members should have this access, select those specific WordPress roles instead of All Logged In Users.
Step 03: Create and Configure the Edit View
Scroll down in Data Views & Edit and click: Create First View

Bit Form will automatically create a new View. Give it a clear name such as: My Support Requests. You can also add a Table Caption if you want a title to appear with the table, for example: Your Support Requests
Sotto Column Mapping, choose the information users actually need to identify a support request. For this form, I would use:
- Nome → First Name + Last Name
- Email → Email
- Complaint → Complaint Type
- Order/Transaction ID → Order Number/Transaction ID
Bit Form lets you map multiple form fields into the same column, so Nome e Cognome can be shown together under one Nome column.
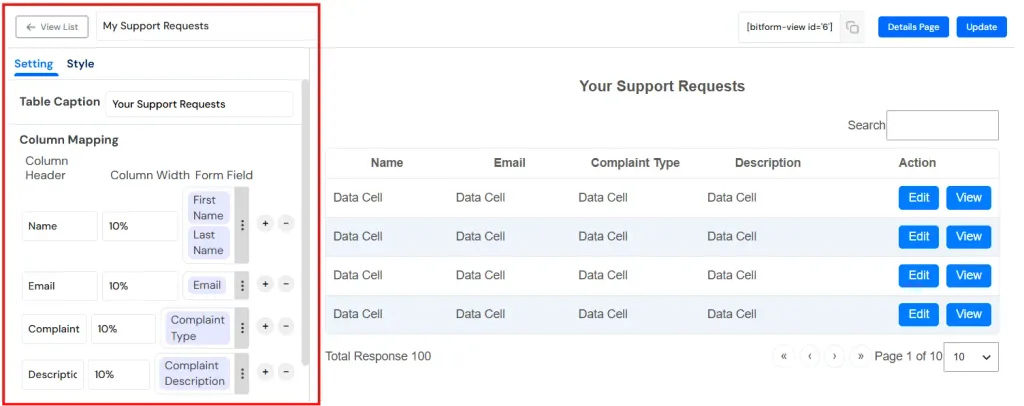
You can also adjust each column’s header name and width. You can include more fields if it is useful for your workflow, but it is not essential for the main support-request list.
Configure the Action Column
Keep Action Column enabled. You can set its title to something simple such as: “Azione“
Then enable the Edit Button. Change the button text to: Edit Request
For the same-page setup used in this tutorial, you do non need to set a Redirect Page or Redirect Link. We will place the original form and the Data View on the same WordPress page.

Bit Form also provides a View Button. You can disable it if you only want users to edit their submissions.
Nota: Il Details Page setting is mainly relevant when you use the View action. If you are only using Edit Request, you do not need to configure a separate Details Page.
Clicca Aggiornamento to save the View.
Step 04: Add the Form and Data View to the Same Front-End Page
Now create the page users will use to submit, view, and edit their support requests. Go to:
WordPress Dashboard → Pages → Add New
Create a page such as: Customer Support Request
You can also use an existing page where the Customer Support Form is already published.
You will need two different shortcodes:
- Form shortcode: embeds the original Customer Support Form.
- Data View shortcode: displays the user’s submitted entries and the available actions.
You can copy the form shortcode from the top of the Bit Form builder. The Data View shortcode appears inside the Data View after it has been created.
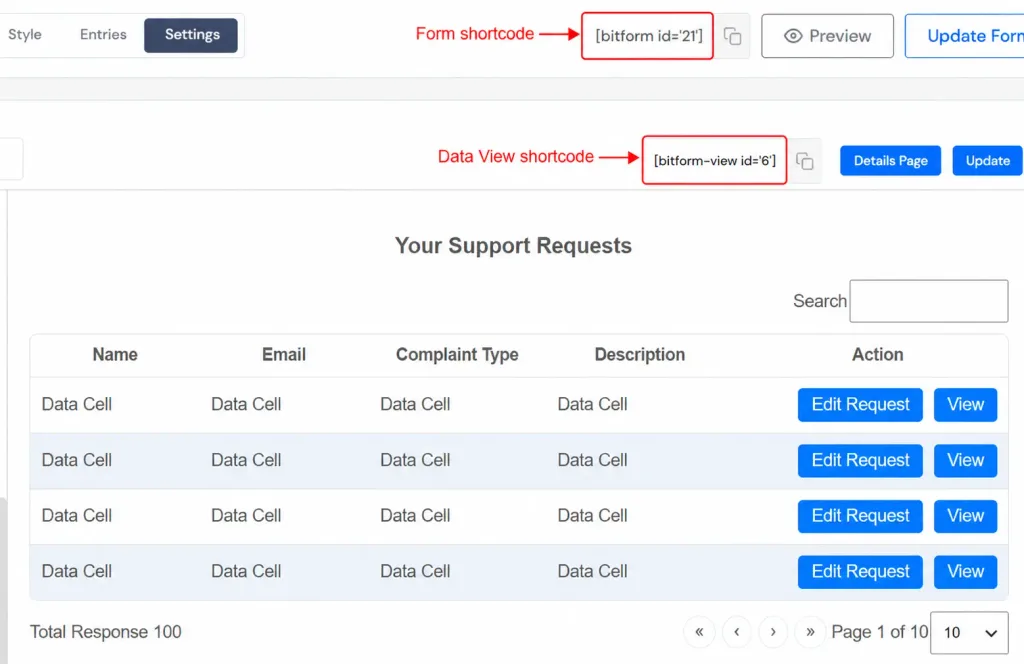
Add the Customer Support Form to the page using its shortcode or the Bit Form Gutenberg block. Then paste the Data View shortcode below the form.

Publish or update the page. After a logged-in user submits the form, their saved entry will appear in the Data View below it, together with the Edit Request bottone.

When the user clicks Edit Request, Bit Form opens the selected entry on the same page and adds the entry ID to the URL, for example:
?bf_entry_id=368
The original form is then populated with the saved values from that entry. The user can change the information and update the existing submission. You do not need to create a duplicate form or configure a redirect for this same-page setup.
When Do You Need a Redirect Page?
A redirect is optional. Use it when you do not want the form and the submission list on the same page. For example:
My Support Requests page
→ Contains the Data View and Edit Request bottone.
Edit Support Request page
→ Contains the original Customer Support Form.
In this setup, open the Data View’s Edit Button settings and select the page containing the original form under Reindirizza Pagina.
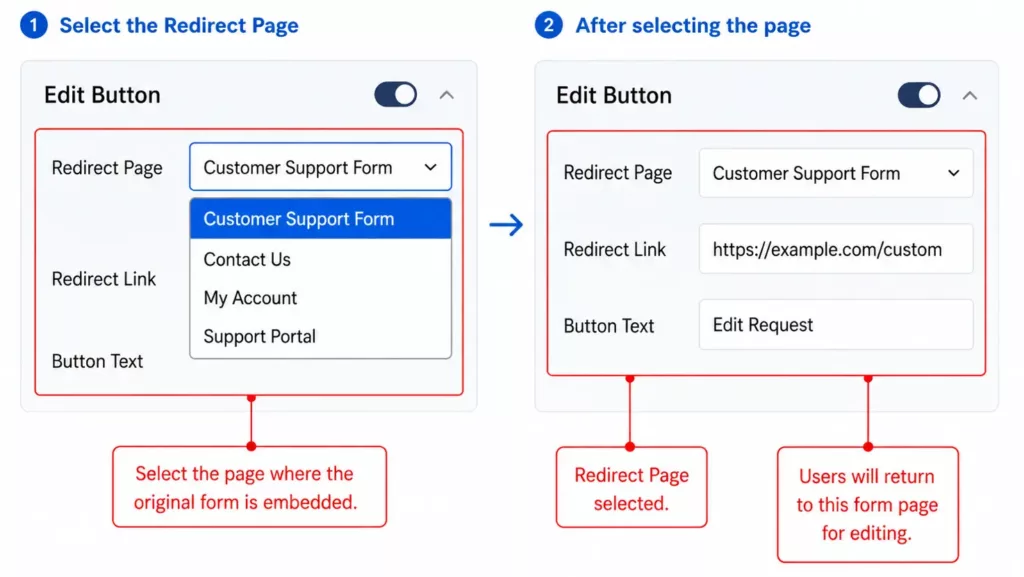
When the user clicks Edit Request, Bit Form sends them to that page with the selected entry ready for editing. You can also use Redirect Link if you need to specify a custom URL.
In short: if the form and Data View are on the same page, no redirect is required. Configure a redirect only when you want users to edit submissions on a different page. You also need to add the form using the shortcode on the different page.
Optional: Style the Submission View
Bit Form also provides a Stile tab for the Data View. You can customize elements such as: Table wrapper, Caption, Search box, Table, Column headers, Table rows, Edit and View buttons, Pagination, Page selector.

The live preview lets you see your styling changes before publishing them. Styling is optional. First make sure the viewing and editing workflow works correctly, then adjust the table to match your website design.
Step 05: Test the Front-End Editing Workflow
Finally, test the setup with a normal user account.
- Log in and submit the Customer Support Form.
- Confirm the entry appears under Your Support Requests.
- Clicca Edit Request and make sure the saved values load into the form.
- Change a field such as Tipo di reclamo, Numero d'ordine/ID transazione, o Descrizione del reclamo.
- Update the submission and confirm the changes were saved.
Also log in with a second user account and make sure it cannot view or edit the first user’s submission. You can verify the updated entry from:
Bit Form → Customer Support Form → Entries
If everything is configured correctly, each logged-in user can view and edit their own submissions entirely from the front end without accessing wp-admin.
Where Front-End Form Submission Editing Is Useful
The feature becomes especially useful when a form represents information that continues to exist after submission.
Member or Customer Profiles: A member may need to update their phone number, address, company, profile details, and preferences. If you are building a broader account workflow, Bit Form also supports WordPress authentication. The WordPress user registration guide covers creating and mapping registration forms.
Job or Membership Applications: An applicant may need to correct a phone number, upload a newer document, or update information after initially applying. Instead of creating another submission, they can update the existing entry.
Event Registrations: Attendees may need to change details such as a contact number, attendee information, or another editable registration field before an event.
Customer Portals: A front-end form submission editing workflow can act as part of a simple customer portal where customers can maintain records without entering the WordPress dashboard.
User-Submitted Listings or Records: If a form is used to collect directory information, project details, property information, or another record that changes over time, letting users edit their own entries is often more practical than treating every change as a new submission.
Front-End Entry Editing Is Not the Same as Save and Continue
These two features solve different problems.
Save and continue / partial submission is for a form that has not been completed yet.
Front-end entry editing is for a form that has already been submitted and needs to be changed later. For example:
- A user starts a 20-field application today and completes it tomorrow → partial submission/save progress.
- A user submitted the application last week and now needs to change their phone number → front-end entry editing.
If unfinished forms are the problem you are trying to solve, see our guide on how to capture partial entries and reduce form abandonment.
Check Your Automations Before Allowing Entry Updates
If the form sends emails, runs integrations, or uses conditional actions, check what should happen when an existing entry is edited.
An update is not always the same event as a new submission.
For example, you probably do not want a “New application received” workflow to behave like a completely new application every time someone corrects their phone number.
Bit Form’s conditional logic can distinguish actions around record creation, editing, and other form events. If your form has more advanced workflows, review them before opening front-end editing to users.
You can learn more in our guide to advanced conditional logic in WordPress forms.
Common Problems With Front-End Form Editing
- Users cannot see their submissions: Make sure the user is logged in, their role can View Own Entries, the entry belongs to that user, entry storage is enabled, and the correct Data View shortcode is on the page.
- The Edit button is missing: Check that Action Column e Edit Button are enabled, and the user’s role has permission to Edit Own Entries.
- Edit opens the wrong page: If you use a separate edit page, check the Reindirizza Pagina setting and make sure it points to the page where the original form is embedded.
- Users can see other users’ entries: Remove regular users from Allow Roles to View Other’s Entries and keep Prevent Public View of Entries enabled.
- Users can view but cannot edit: Enable Allow Users to Edit Form Entries and make sure the required role can Edit Own Entries.
- Updates trigger unwanted actions: Review the form’s conditional logic, emails, and integrations to make sure they behave correctly when an existing entry is updated.
A Simple Permission Setup I Recommend
For a typical customer or member-facing form, start with the smallest amount of access required:
- Require login before submission.
- Prevent public viewing of entries.
- Allow the user role to view its own entries.
- Do not allow the role to view others’ entries.
- Allow the role to edit its own entries.
- Do not allow the role to edit others’ entries.
Only expand these permissions when the site’s workflow actually requires it. This gives users control over their own submitted data without giving them unnecessary access to other records or the WordPress dashboard.
Give Users a Way to Update the Record They Already Created
A form submission does not always become permanent the moment someone clicks Submit.
Customer information changes. Applications need corrections. Member profiles need updates. Registration details can become outdated.
For those cases, asking users to submit the entire form again creates duplicate records and more work for everyone.
Bit Form’s Front-end View & Edit feature gives you a cleaner workflow. Keep the original entry, let the correct user update it from the front end, and control access through WordPress roles.
The important part is not simply enabling an Edit button. Configure ownership and permissions first, expose only the fields and actions users need, and test the workflow with more than one user account before putting it into production.
FAQs About Letting Users Edit Form Submissions in WordPress
Can users edit their own form submissions from the WordPress front end?
Yes. Bit Form Pro includes Data Views & Edit, which can display submitted entries on the front end and allow permitted logged-in users to edit their own form submissions without using wp-admin.
Can users edit only their own form entries?
Yes. Bit Form provides separate role permissions for editing a user’s own entries and editing entries belonging to other users. For normal members or customers, allow Edit Own Entries and keep Edit Others’ Entries restricted.
Do users need to log in to edit a Bit Form submission?
Front-end entry editing is intended for logged-in users. For an own-entry editing workflow, requiring users to log in before the original form submission also provides a clear association between the WordPress user and their entry.
Is front-end form submission editing available in Bit Form Free?
No. Data Views & Edit is a Bit Form Pro feature. The current Bit Form Free vs Pro comparison lists Data Views & Edit under the Pro feature set.
Do users need WordPress dashboard access to edit their entries?
No. You can create front-end pages for viewing and editing form submissions. Users can manage the entries you permit without accessing wp-admin.
Can administrators still edit the submissions from the backend?
Yes. Site administrators can continue managing stored submissions through Bit Form’s Entries area while permitted users manage their own entries from the front end.


Blog correlato
How to Create a Digital Consent Form With Signature in WordPress

How to Create a Real Estate Lead Capture Form in WordPress

