

 EN
EN  ES
ES  DE
DE  PT
PT  IT
IT  JA
JA  ID
ID How to Create a WordPress Stripe Payment Form Without WooCommerce

Do you want to accept payments on your WordPress site, but you don’t want a WooCommerce store? Well, don’t worry! You can do that.
Stripe supports several ways to accept payments online, including prebuilt checkout experiences, while if you want to do it in WordPress, form builders can add a payment option directly to a form.
A WordPress Stripe payment form lets you collect customer details and payments directly through a form, without adding a shopping cart or product catalog. You can build one with modern form plugins like Bit Form, connect your Stripe account, add the payment field, and publish the form on your site.
In this guide, I’ll show you how to set it up step by step and test the payment before accepting real transactions.
Do You Need WooCommerce to Accept Stripe Payments in WordPress?
No. You can accept Stripe payments from a WordPress form without setting up WooCommerce.
The important thing is understanding what you actually need. WooCommerce is built to run an online store, so its setup revolves around products, a cart, checkout, orders, customer accounts, shipping, taxes, and other store-related functions.
That makes sense if you’re selling multiple products and need customers to browse items, add several products to a cart, and complete an order. WooCommerce’s Stripe integration is designed around that store and checkout workflow.
But suppose your goal is much simpler. You have one service, an event registration, a consultation, a donation, or a booking deposit, and you just need to collect the customer’s information and payment. Setting up WooCommerce means configuring the store, payment gateway, products, and any relevant tax or shipping settings. For a simple one-off payment flow, that can add more setup and maintenance than you actually need.
On the other hand, if you create a WordPress Stripe payment form using a form plugin, you can keep the process around the form itself. Add the fields you need (for customer details), connect your Stripe account, and add the Stripe payment field to the same form.
So the question isn’t really “Does Stripe require WooCommerce?” It doesn’t. The better question is “Do I need WooCommerce’s full store and order-management workflow?”
Clear answer: If you’re building a multi-product store, WooCommerce may be the right foundation. If you only need to collect information and a payment for a specific purpose, you can skip the store setup and build the payment form directly.
Now, let’s see what we need to set up a Stripe payment form in WordPress.
What You Need Before Creating the WordPress Stripe Payment Form
Before building the form, you only need a few things in place. Having these ready will make the setup much smoother and faster.
- A WordPress website
- A form plugin with integration with Stripe
- An active Stripe account
- Access to your Stripe Developer Dashboard
For today’s guide, I’ll be using Bit Form. The plugin integrates with multiple payment gateways like Stripe, PayPal, Mollie, and Razorpay natively. For payment integrations, you’ll need the Pro version of the plugin.
Bit Form’s Stripe integration is available through its payment settings. You can connect your Stripe account using the Publishable Key and Secret Key, then add the Stripe field directly from the form builder. Or you can directly configure it from the builder.
Test Your Form Before Accepting Real Payments
I recommend starting with Stripe Test mode. Bit Form’s documentation uses Test mode for the setup process and notes that you need to switch to Live mode when you are ready to accept real transactions.
This gives you a chance to check the complete payment flow before putting the form in front of customers. You can also use Bit Form’s preview feature to test the form fields and connected integrations before publishing it.
How to Create a Stripe Payment Form in WordPress Without WooCommerce
Now that you have the basics ready, you can build the payment form. I’ll use a simple service payment form for this walkthrough, but you can adjust the fields for donations, bookings, registrations, or other payments.
Step 01. Create a New Form in Bit Form
From your WordPress dashboard, open Bit Form and create a new form. You can start with a blank form or use a template if one fits your use case.
For this example, I’ll start with a blank form so you can see how the payment setup works from the beginning.

Step 02. Add the Customer Information Fields
Now drag-and-drop fields into the builder. Add only the information you actually need. In this form, I’ll be collecting this information:
- First Name
- Last Name
- Phone Number
- Service they want to buy
- Quantity
- Consultation fee

Step 03. Connect Your Stripe Account
Before adding the payment field, you must connect your Stripe account to Bit Form.
Go to Bit Form → App Settings → Payments → Stripe. Give the integration a meaningful name, then connect your Stripe account using the Publishable Key and Secret Key from your Stripe Developer Dashboard.

For the initial setup, keep Stripe in Test mode. Switch to Live mode only when you are ready to accept real payments.

After you add the keys, save the Stripe configuration.
Step 04. Add the Stripe Payment Field
Open your form in the Bit Form builder and search for Stripe in the field list. Add it to your form by clicking it or dragging it into the desired position.

At this point, your form has the customer information and the payment section. The next step is to decide how much the customer should pay and how that amount should be collected.
Step 05. Set the Payment Amount
Now you need to tell Bit Form how much the customer should pay. The Stripe field supports two options, Fixed and Dynamic, so the right choice depends on how you charge.
Fixed Payment Amount
Choose Fixed when every customer should pay the same amount.
For example, if you are collecting a $50 consultation fee, enter 50 as the payment amount. Every successful payment through that form will use the amount you set.
This works well for registration fees, service deposits, application fees, or any other payment with a set price.
Dynamic Payment Amount
Choose Dynamic when the amount depends on what the customer selects or enters in the form.
For example, you could add a Number field called “Quantity” or a Radio Button field containing different service options, just as I did. You can then use the selected value as the payment amount.
You can also calculate a total based on form inputs before sending it to the payment field. Bit Form supports calculations based on form inputs, which can be useful when the final amount depends on multiple values.

For example, a simple service form could work like this
Choose a service → Calculate the total in a form field → Select that field as the Stripe dynamic payment amount
This gives you more flexibility than asking every customer to pay the same fixed amount.
Choose the Currency
In the Stripe field settings, select the currency you want to charge in. Once the amount and currency are configured, update the form to save your payment settings.
Note: Available currencies can vary depending on the payment method selected.
Configure Confirmation and Email Notifications
After completing the payment, the customer should get a clear confirmation, and you should receive the submission details on your side.
Well, you can handle both from the form settings. You can show a custom success message or redirect the customer to another page after submission. You can also create email notifications for form submissions for the site owner and the person who submitted the form.
Create a Confirmation Message
Open the form settings and go to the confirmation settings.
For this payment form, keep the message simple and make it clear that the submission was received.
For example, “Payment successful. Thank you for your purchase. We’ve received your payment and will contact you shortly.”

If you have a dedicated thank-you page, you can use the redirect option instead.
Set Up Email Notifications
Next, configure the email notifications.
The email notification settings let you choose the recipient, sender, reply-to address, subject, and email content. You can also pull information directly from the form fields using smart tags.
For this form, set up two notifications if you need both sides to receive an email.
Admin notification: Send the submission details to the email address where you manage payments.
Customer notification: Send a confirmation to the customer email address entered in the form. Keep this message focused on the payment and what happens next.
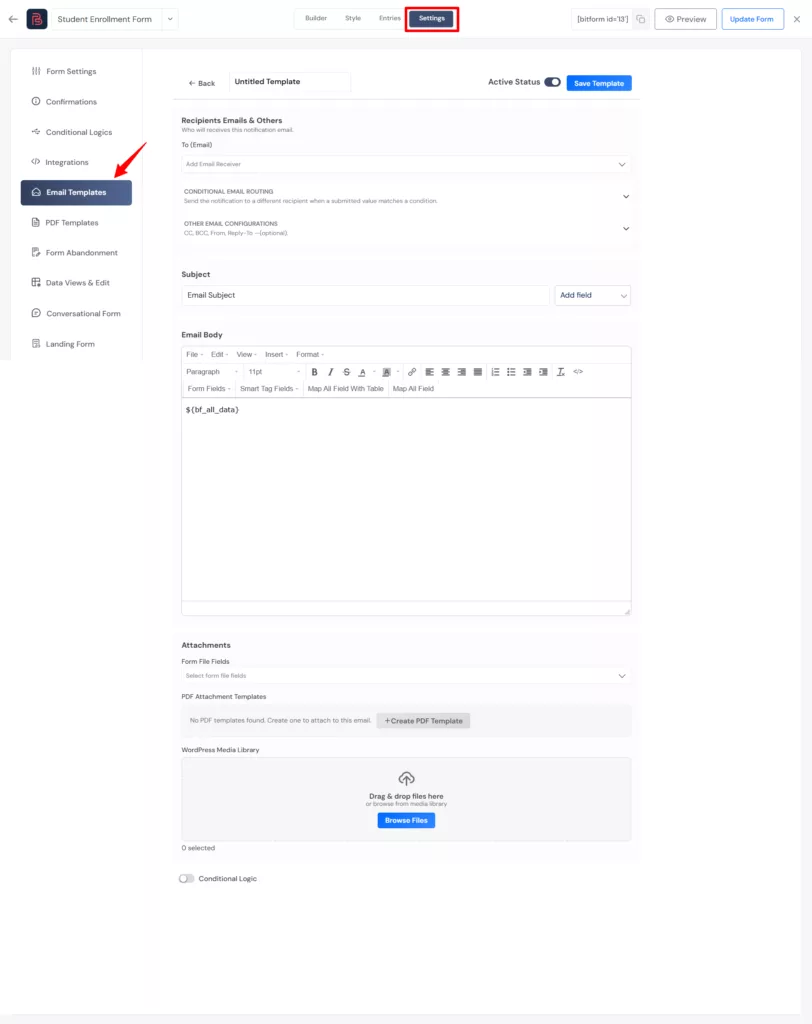
You can use dynamic form fields in the subject and body, so the email can include information submitted by the customer. Before relying on email notifications, make sure SMTP is configured for your WordPress site.
Once the confirmation message and emails are ready, save the form. The next step is to test the complete payment flow before accepting real Stripe transactions.
Test the Stripe Payment Form Before Going Live
Before accepting real payments, test the entire form from the customer’s side.
As I said earlier, use Stripe test mode to test the WordPress Stripe payment form.
- Preview the Form First. Then fill the form with sample information and check whether the fields, conditional logic, calculations, and connected integrations behave as expected. Bit Form also provides a dummy data option to speed up this testing process.
For this service payment form, check that:
- Quantity updates the total correctly
- The Stripe field displays properly
- The payment completes successfully
- The confirmation message appears
- Email notifications arrive correctly
- Run a Stripe Test Payment. Pay particular attention to the amount sent to Stripe. If you are using a dynamic amount, test more than one combination. For example, select a different service and change the quantity to confirm that the payment amount updates correctly.
- Switch to Live Mode. Once you have confirmed that everything works as expected, switch your Stripe integration from Test to Live mode and use your live Stripe credentials.
Publish the Stripe Payment Form on Your WordPress Site
Once your form is tested, add it to the page where you want to accept payments in WordPress.
Bit Form gives you two simple options:
- Gutenberg: Add the Bit Form block and select your payment form.
- Shortcode: Copy the form shortcode and paste it into the page where you want the form to appear.
Publish or update the page, then open it on the front end to make sure the form displays correctly on desktop and mobile.
You can now accept Stripe payments in WordPress.
What Can You Use a Stripe Payment Form WordPress For?
A Stripe payment form works well when you need to collect a payment without building a complete online store around it.
For example, you can use a payment form for:
- Service payments such as consultations, audits, coaching, or freelance work
- Event registrations where attendees select an option and pay during registration
- Donation payments where visitors enter or select an amount
- Membership or application fees
- Bookings and deposits where customers pay a fixed or calculated amount
- Custom orders where the final price depends on information entered in the form
Also, along with the payment, you can ask for contact details, selections, quantities, or other information and then use those values as part of the payment flow.
For a simple payment request, that can be enough without introducing a full store structure.
Stripe Payment Form vs WooCommerce
A Stripe payment form in WordPress and WooCommerce can both accept payments, but they solve different problems.
WooCommerce is designed around ecommerce. Its core workflow includes products, carts, checkout, orders, and inventory management. You can also configure shipping, taxes, product variations, coupons, and other store-related features.
A payment form takes a narrower approach. You create a form, collect the information you need, calculate the amount when necessary, and send the customer through the Stripe payment process.
| Feature | Stripe payment form | WooCommerce |
| Collect a payment | Yes | Yes |
| Typical setup | Usually quicker for a simple payment form | Usually requires more initial store configuration |
| Product catalog | Not required | Core ecommerce feature |
| Shopping cart | Not required | Yes |
| Order management | Form-based workflow | Built-in order system |
| Inventory management | Not the main purpose | Built in |
| Shipping | Usually unnecessary | Supported |
| Dynamic form-based pricing | Supported with Bit Form | Supported through products and extensions |
| Best suited to | Services, fees, registrations, donations, simple payments | Online stores and product-based ecommerce |
Neither one is a replacement for the other. Both have distinct audiences.
If you are building a store with multiple products, inventory, shipping, and order management, WooCommerce provides those e-commerce features.
If you only need a focused payment flow on a WordPress page, a form can keep the setup centered on the information and payment you actually need.
Create Your Stripe Payment Form Without WooCommerce Today!
You do not need to build a complete online store just to collect a payment on a WordPress website.
If your website sells multiple products and needs a cart and full order management, WooCommerce may be the more appropriate option.
But if your goal is more focused, such as collecting a service fee, event registration payment, donation, or booking deposit, a payment form can keep the workflow much simpler.
For that, you just need a form builder with Stripe integration. If you already use one, create your form, collect customer information, connect your Stripe account, and start accepting payments.
If you prefer a dedicated payment-form platform rather than a general WordPress form builder, PaymentForm.io lets you create form-based checkouts, connect Stripe and other supported gateways, and share or embed the form without setting up WooCommerce.
So before installing WooCommerce, ask yourself one question: Do you need an online store, or do you simply need a form that collects a payment?
If it’s the second one, you can follow the setup shown above.
Frequently Asked Questions
Can I accept Stripe payments in WordPress without WooCommerce?
Yes. You can use a WordPress form builder with a Stripe integration to collect payments without installing WooCommerce. This approach works when you need a payment form rather than a full ecommerce store.
Do I need a Stripe account to create a Stripe payment form?
Yes. You need a Stripe account to connect the payment integration and process transactions.
Can I let customers enter their own payment amount?
Yes. Bit Form Stripe integration supports dynamic payment amounts.
Can I create a payment form for donations?
Yes. A donation form can use a fixed donation amount or a dynamic amount, depending on how you want donors to enter or select their contribution. Bit Form lists donations among the use cases for its payment forms.
Can I test Stripe payments before accepting real money?
Yes. Enable Test mode, which you can use while setting up and testing the payment flow. You should switch to Live mode when you are ready to process real transactions.
Can I send a payment confirmation email after submission?
Yes. With Bit Form, you can send email notifications after form submission, and you can use submitted form information in the notification. SMTP needs to be configured for the email notification feature to work.


Related Blog

How to Create a Fundraising Event Registration Form With Payments

How to Schedule a WordPress Form by Date and Time