Are you tired of static forms that don’t respond to your users? Imagine filling out a form where certain questions pop up based on the user’s previous answers, or where the form adapts to provide personalized options. Sounds pretty cool, right?
Well, the Conditional logic feature does just that! This feature saves time for both you and your users. When someone fills out a contact form, they only see fields that matter to them. A support ticket form can show different options based on issue type. An order form can calculate prices dynamically as users make selections.
In this guide, we’ll show you how to add advanced conditional logic in WordPress forms. Let’s dive into it.
Conditional logic makes rules that change how a form works based on what the user says. The form responds right away when a visitor chooses an option or types in certain information, without having to reload the page.
Think of it as an if-then system. If a user selects “Business Inquiry” from a dropdown, then show fields for company name and industry. If they choose “Personal Question,” those business fields stay hidden.
Traditional forms show every possible field upfront. This creates long, intimidating forms that reduce completion rates. Conditional logic breaks forms into logical sections, revealing fields only when needed.
Static forms are often long and boring. Most users leave a page if they see too many questions that do not apply to them. Studies show that reducing form fields can increase conversion rates by up to 120 percent.
When you use conditional logic in WordPress Form, you create a personalized journey. The form reacts to every click.
The system monitors form inputs continuously. As users click on checkboxes, radio buttons, dropdowns, or text fields, the logic engine checks the conditions and changes the form structure right away.
The first thing you need to do is choose the right WordPress form builder. This choice is very important for making sure that both flexibility and functionality are present. I chose Bit Form out of all the options because it is known to be the most advanced and lightweight WordPress form builder.
Once you’ve installed and activated the plugin, go to the Bit Form dashboard and click on “Create Form.” You’ll see a list of templates that are already there. To start from scratch, select “Blank Form,” which gives you complete control over the design.

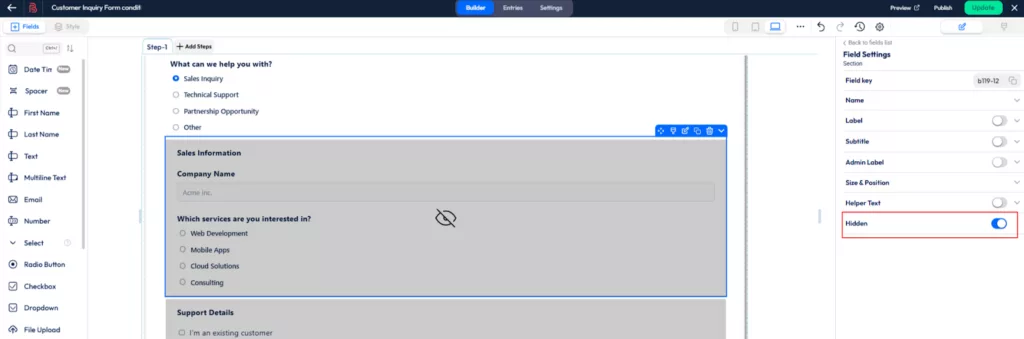
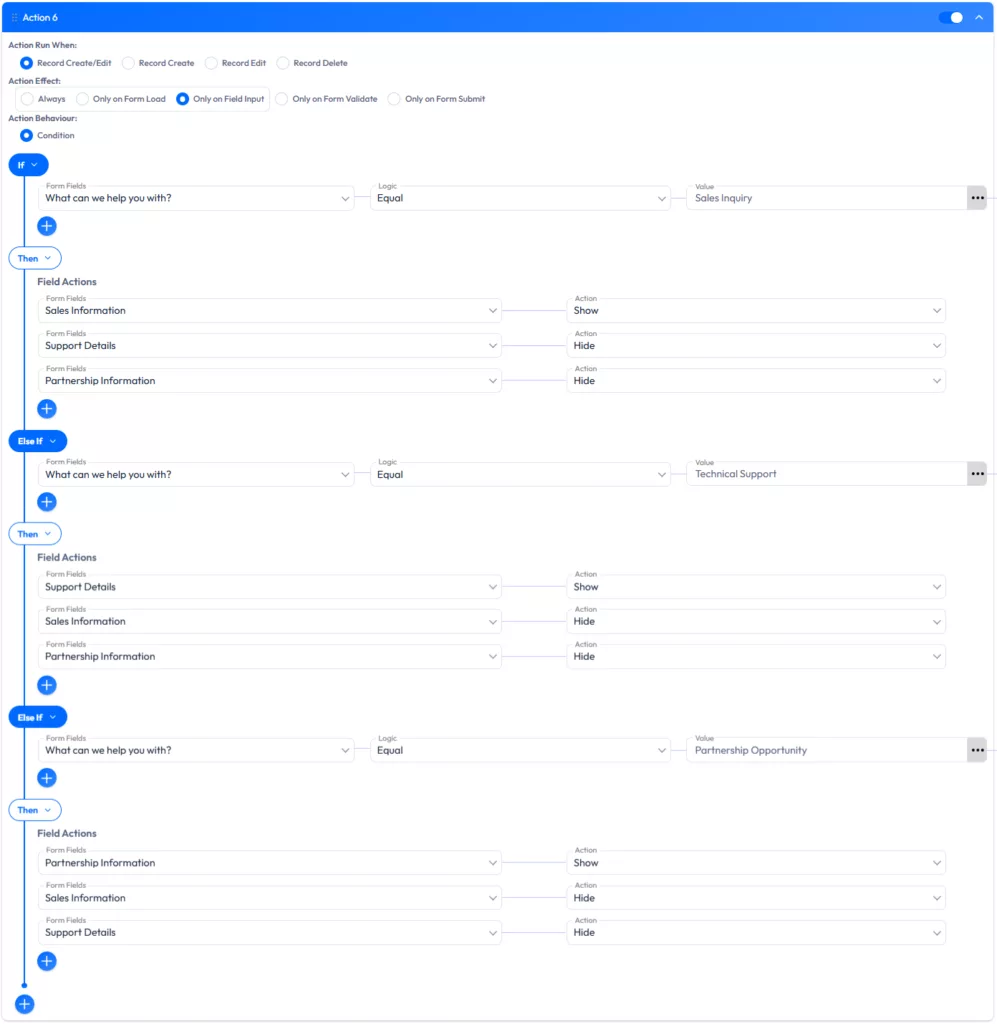
Then create a form. I have already created a customer inquiry form and added several fields. I entered four choices in the “Select” field: Sales Inquiry, Technical Support, Partnership Opportunity, and Others. I have also entered the other fields into groups based on the type of inquiry.
Before setting up the conditional logic, you need to hide all the categorized fields.
Then go to Settings > Conditional Logics > Click on “Add Conditional Logic.”

Before building logic rules, you need to define when and how those rules should activate. Bit Form allows you to set triggers based on specific form action rather than just user input.

As I’m working with the show/hide field, I selected “Only on field input.” Then, apply the condition as shown in this image.

Similarly, apply the same condition for the other options. Then click on “Update” and preview it.

You can also set these three conditions under one condition by using “else if” condition.
You already know how easy it is to make forms that change by showing and hiding fields based on simple rules like If, Else, and Else If. But what if you could take that logic even further?
Imagine being able to handle more difficult situations, like nesting several conditions, making calculated fields, or starting different actions based on what a user chooses, all without having to write any code.
These features will give you even more control and flexibility to make your forms truly interactive and unique. Let’s take a look at Bit Form’s advanced conditional logic tools.
A single rule isn’t always enough. You may need to combine different conditions to make a decision. This is where AND/OR logic becomes very helpful. You can create groups of rules to handle tricky scenarios.
If you have a complex workflow, you can use “Else If” and “Else” branches. This makes sure that every possible answer from a user leads to a specific outcome. Nested conditions let you get into the details without making the backend messy. This well-organized structure makes it easy to handle hundreds of responses without making any mistakes.

Set conditions like these to make strong logic:

You can use these operators to set exact rules that will make your forms more dynamic and responsive.
After you set up your logic, you can control how each field works based on the rules you’ve set.

You can control how your form responds at every step of the submission process with these actions.
One of the most powerful uses of conditional logic is in email notifications. Let’s say you want to send a thank-you email only if a user selects “Yes” to a specific question. With Bit Form’s conditional logic, you can automatically send personalized emails based on a user’s answers.

Click the Save Template button after you’ve made the email template. You can also make as many email templates as you need.

Next, go to Conditional Logic, choose the condition you want to send the selected email template for, and set the Action Effect to “Only on Form Submit.” Then, under Additional Actions, check the Email Notification box and choose the email template you want.

You can even add dynamic PDFs that change based on what the user fills out. If someone fills out a quote form, for instance, they will get a PDF with the information they gave.
Go to PDF Templates, just like you did for the email template settings. You can make more than one template here.

Then navigate to Conditional Logic, select the specific condition for which you want to send the selected PDF template, and set the Action Effect to “Only on Form Submit.” Next, scroll down and find the “PDF Attachment Template” option under Email Notification. And choose the PDF template you want.

You can send users to different landing pages after they fill out a form, based on what they say. This can make the user’s experience more personal and help them find more useful content or actions to take next.
To set up the redirect URL, go to confirmations and click on “Redirect Page.” Then, click the “+” sign to add the link.

After that, put the URL for the redirect in the “Link” box. You can make more than one redirect page for different choices by clicking the “+” icon.

Then go to Conditional Logic, choose the condition you want to use for the redirect, and set the Action Effect to “Only on Form Submit.” After that, scroll down until you see the Redirect URL option under Additional Actions. And choose the redirect URL you added under “Confirmations.”

Setting up conditional logic is important if your website has a calculator form or any other form that needs to do math.
For instance, if you have a form where users enter things like the amount of a product and the VAT, the total amount field can be automatically calculated from these inputs.
You can easily make forms like a lead scoring form, a BMI calculator, an ROI calculator, or a mortgage calculator with Bit Form’s Advanced Calculation feature.
Let’s use conditional logic to make a VAT calculator. To start from scratch, just go to the bit form dashboard and make a blank form. I’ve already added the fields I need to make a VAT Calculator here.

Now you need to add conditional logic to the calculation. To get started, just go to Settings > Conditional Logics > Add Conditional Logic > set Action Effect as “Only On Form Submit.”
Then set the condition like below:
That’s it. You will get the result. You can also test it here.

Conditional integration builds on the power of conditional logic by making it easy to connect your WordPress forms to other platforms.
For example, if someone fills out a lead scoring form, you can use conditional logic to send hot leads to Google Sheets or add them to a Mailchimp email marketing campaign automatically. This feature saves you time because you don’t have to type in data by hand, which speeds up your form submissions even more.
And the best part is Bit Form offers over 50 integrations, all available in the free version. Additionally, by installing the Bit Integrations plugin and selecting Bit Form as a trigger, you can connect your forms with more than 150 applications, all without any additional cost.
For instance, you could have a lead scoring form that puts users into hot, warm, or cold leads based on how they answer. I already made a form to give leads a score. Here it is.

You can also see that I added a number of fields to score a lead, as well as two hidden fields that use user responses to figure out the score. You might be wondering how the lead is scored based on the different field options.
The answer is easy: I’ve given each field option a different value, like this.

You need to add conditional logic to score the lead now. To do this, go to Settings > Conditional Logics > Add Conditional Logic and choose “Only On Field Input” as the Action Effect.
Then, set the condition like this:

After that, the lead will be scored by adding up the values of all the options the user chose. Then, I added another condition to sort the lead into one of three groups: Hot Lead, Warm Lead, or Cool Lead.
This is how the condition is set:

Now it’s time to set up the conditional integration for the leads that are hot. Go to Integrations and look for Google Sheets.

Then, do the following steps:
Once you have successfully entered your Client ID & Client Secret, click “Authorize” to proceed.

In step 2, you need to choose “Authorize App,” “Spreadsheets,” and “Worksheet” from the drop-down menu. After that, you will see the option to “Map Fields.”
You will need to map the fields from your form to the right fields in the Google Sheet here. After that, click “Next.”

When you’re done setting up the integration the way you want it, click “Finish & Save.”

Next, go to Conditional Logic, pick the condition for which you want to set up the conditional integration, and set the Action Effect to “Only on Form Submit.”
After that, scroll down until you see the Integration option under Additional Actions. You can also put more than one integration under the same condition.
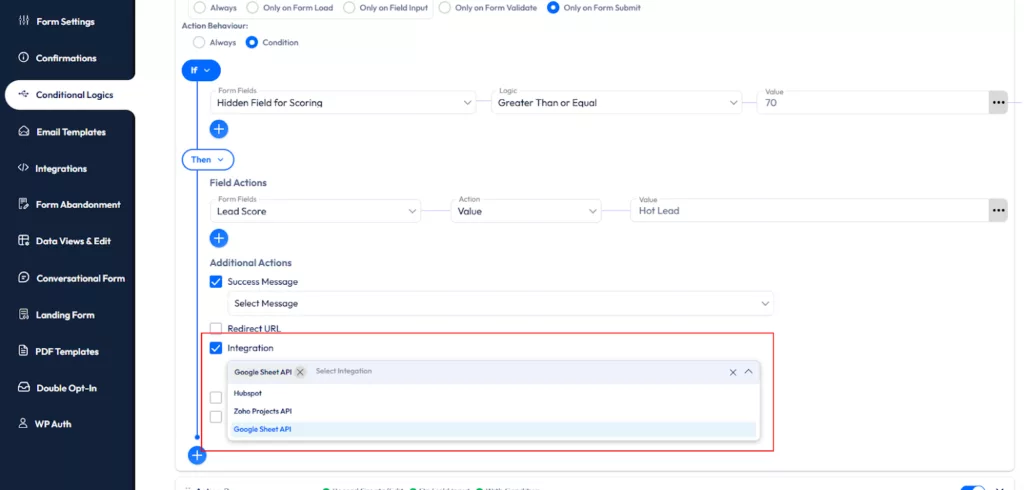
This conditional integration lets you focus on the leads that matter most, while the rest are automatically organized and cared for.
In my experience, the best forms are the ones that feel like a conversation. You should always aim for clarity first and technical detail second. Using logic reduces the “mental load” for your visitors.
When you build a conditional logic form in WordPress setup, you are not just collecting data. You are providing a service. According to industry experts, user experience is a top-ranking factor for modern websites.
Your forms will be smarter and more interesting with Bit Form’s conditional logic. You can give each user a unique experience, which will make them more likely to fill out the form and make them happier.
So, start with the basics and add more as you learn more about how the system works. Try it out, listen to what users have to say, and change the logic based on how well it works in real life.
Conditional logic allows you to show, hide, or modify form fields based on user input, creating a personalized experience without page reloads.
Install a form builder like Bit Form, navigate to the settings, and use the “Add Conditional Logic” feature to define when fields should appear or change.
Yes, with Bit Form’s advanced conditional logic, you can trigger email notifications based on specific user selections, such as sending a “Thank You” email for particular responses.
Yes, it ensures fields are validated only when necessary, reducing user errors and improving the accuracy of form submissions.
Yes, Bit Form’s advanced conditional logic can perform real-time calculations like pricing, tax, or score-based fields based on user input.
Yes, Bit Form’s conditional logic allows you to redirect users to different pages based on their form responses, enhancing user flow and experience.
By simplifying forms and displaying only relevant fields, conditional logic keeps users engaged and reduces frustration, leading to fewer drop-offs.
Typically, conditional logic doesn’t significantly impact form speed, but complex logic with too many conditions can potentially slow down performance.
Yes, Bit Form’s conditional logic works well with multi-step forms, showing relevant fields or steps based on previous user inputs.