
How to Create a Customer Inquiry Form (Step-by-Step Guide)

Imagine this: It’s 10 a.m. on a Sunday morning, and your email inbox is flooded with customer questions, your phone won’t stop ringing, and you have a stack of handwritten notes from a customer who called over the weekend. Someone else filled out that contact form on your site, but you’re left wondering which form was that again? One customer wants a quote, another needs technical support, and three more are asking about your return policy, but their messages are scattered across email, social media, and voicemail.
And then you’re spending more time looking for customer information than actually helping them. The worst part? Important opportunities are slipping away, potential sales are walking away, and your team is burning out trying to manage the chaos.
Sound familiar? You’re not alone.
What if there was a better way to make all of this work? What if you could turn random customer questions into organized, trackable requests that really help you serve them better?
The solution is simpler than you think: a well-designed customer inquiry form. Not just any generic contact form, but a strategic tool that captures exactly what you need, when you need it, and organizes everything in a way that makes your life and your customers’ lives infinitely easier.
Let’s explore why a Customer Inquiry Form matters, how to create a customer inquiry form for free, and how WordPress Form Builder makes the process easier.
Table of Contents
Why a Customer Inquiry Form Matters
Let’s be honest: most businesses are flying blind when it comes to customer communication. They’re reactive instead of proactive, scattered instead of organized, and frankly, it’s costing them money and reputation. But a well-designed customer inquiry form isn’t just nice-to-have, rather it’s like hiring a 24/7 digital assistant for your business. Here’s why it matters:
Streamlined Communication That Actually Works
Think about the last time you got an email that said, “problem with your product.”
Which product? What’s the issue? How urgent is it? What have they already tried?
You probably spent more time going back and forth trying to figure it out. But a customized customer inquiry form stops this back and forth by getting all the important information up front.
Instead of generic messages, you get organized questions with specific categories, detailed descriptions, and all the information you need to give useful help. Your support team can quickly tell if someone needs help with a technical issue, wants pricing information, or has a question about their bill. This means faster response times and more accurate solutions.
Professional Image That Builds Trust
Customers judge your business based on how easy it is to reach you. When customers see a professional, easy to use customer inquiry form, it sends a clear message: “this business has its act together.”
You’re not just another company hoping customers will somehow figure out how to reach you. You’ve thought through the customer experience and created a system that respects their time and yours.
Time Efficiency That Multiplies Your Results
This is where customer inquiry forms can really make a difference when it comes to productivity. You don’t have to spend 15 to 20 minutes on each question trying to get basic information; you already have everything you need. Your team can quickly send technical questions to the right department, prioritize urgent issues, and prepare comprehensive responses.
Think about it: If you get 20 customer inquiries a day and save 10 minutes on each one by being better organized, that’s more than 3 hours a day. That’s time you could be using to solve problems instead of looking for information.
Better Customer Experience From Day One
Customers don’t want to work to get help from you and nobody likes waiting days for a reply. They want to quickly explain their situation and get a useful response.
When customers can easily categorize their inquiry, provide relevant details, and even indicate their preferred response method, they feel heard and understood. This positive first impression sets the tone for the entire relationship.
Data Organization That Drives Better Decisions
Every customer inquiry form submission becomes valuable for growing your business. Over time, you start to notice patterns, like what kinds of questions come up the most, which products or services cause the most confusion, and where you could improve your communication.
This organized way of collecting customer data helps you run your business better. You might find that 40% of questions are about shipping policies. If that’s the case, it’s time to make that information easier to find on your website. Or maybe you see a lot of technical support requests for a certain product feature. This is valuable feedback for your development team.
24/7 Availability Without the Overhead
An online customer inquiry form is always available, never takes breaks, and never misses an opportunity. So it can get leads and support requests even when your team isn’t available.
This constant availability not only improves customer satisfaction, but it can also have a big effect on your bottom line by ensuring no potential sales are lost because of timing problems.
Cost Reduction Through Smart Automation
The customer inquiry form dramatically reduces the manual work involved in managing customer communication. Automated email notification let customers know their message was received, routing rules ensure inquiries reach the right team member, and organized data makes follow-up efficient and effective.
And the best part? You can create a customer inquiry form in WordPress for free using Bit Form with 50+ built-in integrations.
Step-by-Step Guide: Creating Your Customer Inquiry Form
Ready to transform your customer communication chaos into an organized, efficient system? Here’s how to create a customer inquiry form that people actually want to fill out.
Wait, before that, you have to install a WordPress Form Builder in your dashboard. In this tutorial, I’m using Bit Form. It’s a modern, lightweight and most advanced WordPress form builder. The best part? Most of its powerful features are available in the free version, so you don’t have to spend a bunch of money to get started.
Step 1: Figure Out What You Actually Need to Know
This sounds obvious, but most businesses get it backwards. They either ask for everything, including your childhood pet’s name, or they ask for so little that every response requires a follow-up email. Neither works.
Start by reviewing your last 50 customer inquiries. What questions did you have to ask before you could help them? What information would have let you route them to the right person immediately? That’s your essential field list.
Must-have fields:
- Full name (nobody wants to be called “Hey there”)
- Email address (for responses)
- Phone number (marked optional unless you actually need it)
- Company name (if you serve businesses)
- Inquiry category (the secret weapon we’ll discuss next)
- Message details (with enough space for context)
Probably skip:
- Physical addresses (unless shipping is involved)
- Fax numbers (it’s 2026, folks)
- Multiple redundant contact fields
- Information you can look up yourself
The goal? Get exactly what you need without making people feel interrogated.
Step 2: Essential Fields for Customer Inquiry Form
Contact Information: Name and email are required, but consider adding a phone number as optional unless you really need it to follow up. Keep in mind that every required field increases abandonment rates, so respect people’s time and privacy.
Inquiry Category (Your Secret Sorting Weapon): This dropdown might be the most valuable field on your entire form. It lets customers self-categorize their questions, which means you can route inquiries automatically to the right team members.
Inquiry types :
- Sales questions
- Technical support
- Billing inquiries
- Partnership opportunities
- General feedback
Urgency Level (The Priority Sorter): Let customers indicate how urgent their inquiry is. Options like “low / medium / high” help your team prioritize effectively.
Clear CTA Button: Skip the generic “Submit”, use action words like “Send My Inquiry” or “Get Help Now”
Step 3: Let’s Build a Customer Inquiry Form
Enough planning, now it’s time to create the form. After installing and activating Bit Form,
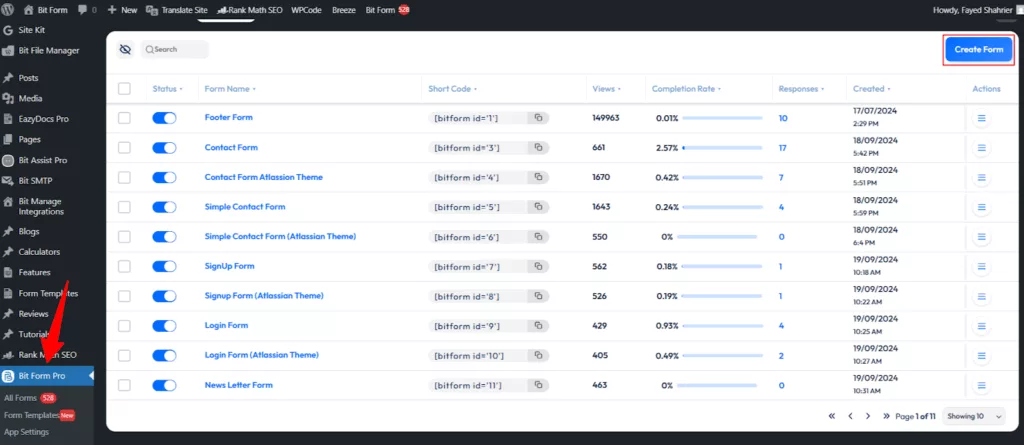
- Navigate to your WordPress dashboard, then go to Bit Form > All Forms.
- Click on “Create Form” to start a new form
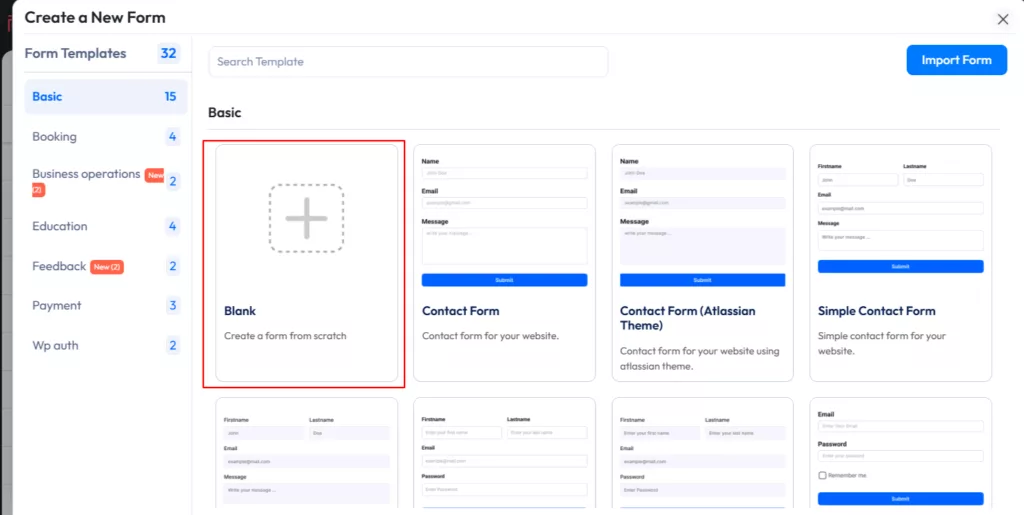
To start from scratch, choose “Blank Form,” which gives you full control over the design. Name your form something descriptive, like “Customer Inquiry Form,” to make it easy to find later.
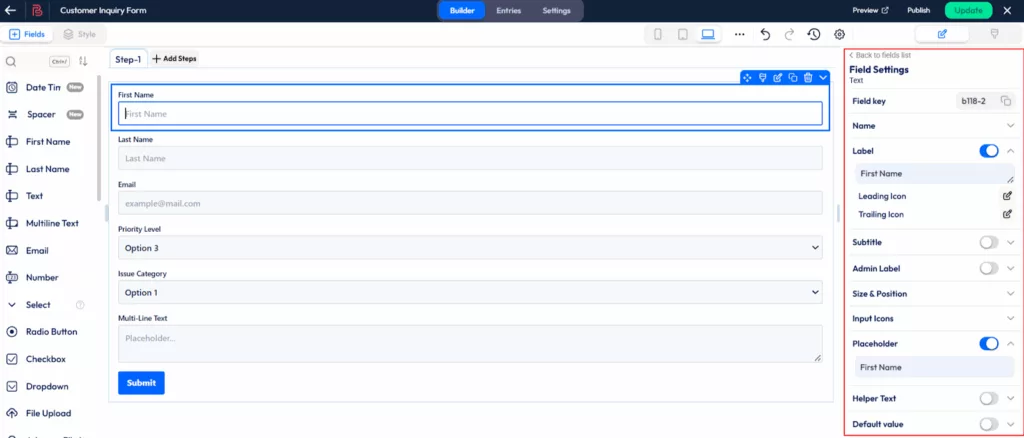
Now you’re ready to start building your customer inquiry form. Just click or drag and drop any field you need into the form builder.

You can change the field name, add a subtitle, or adjust the settings for any field by simply clicking on it.
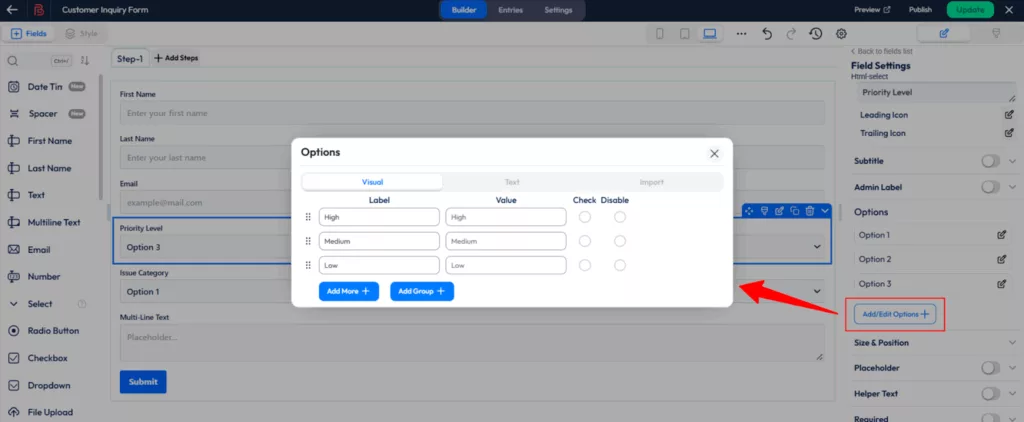
Now, add options for the Priority Level and Issue Category fields.
- Select the Priority Level / Issue Category field.
- Then click on “Add/Edit Options+” in the field settings. Now change the label names
Step 4: Designing for User Experience
Your form’s user experience matters more than you think. A clunky, confusing form is like a store with no signs, people will leave and never tell you why. So your form should be simple, intuitive, and easy to complete on any device.
- Use mobile-responsive design (most inquiries now come from phones).
- Add clear labels and placeholder text for guidance.
- Arrange fields logically – start with contact info, then inquiry details.
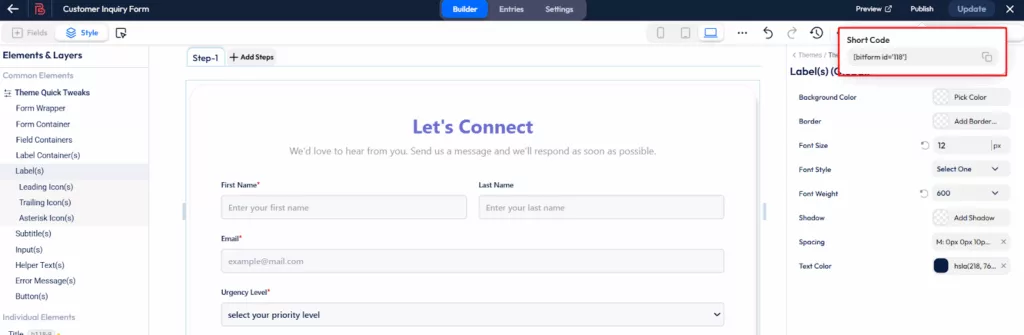
Now click on “Style” to change the style for both common and individual elements. On the right side, you’ll see the customization options.
After styling your form, click on “Preview”, and you’re all set.
Once your form is ready, click the “Publish” button at the top-right corner. Then, copy the generated shortcode and paste it into any page or post where you want the form to appear.
Step 5: Advanced Features That Level Up Your Form
Once you have the basics covered, these advanced features can transform your customer inquiry form from good to exceptional:
- Conditional logic – Show or hide fields based on customer answers.
- File attachments – Perfect for support cases (screenshots, invoices).
- Automated confirmations – Let customers know you’ve received their inquiry.
- Integrations – Send form data to your CRM, Google Sheets, email marketing tools, or helpdesk.
Based on Advanced Features, here is an example of another Customer Inquiry Form. And you can easily create this using the free version of Bit Form.
Common Mistakes to Avoid
Even the best businesses sometimes trip up. Here’s what to watch out for:
- Making forms too long
Only collect what you actually need or break your form into easy multi-steps. - Poor mobile optimization
A form that feels clunky or difficult to use on mobile often leads to instant abandonment - Lack of clear instructions
If customers don’t know what to fill, they’ll give up. Add hints and examples. - No follow-up process
Getting inquiries is great, but if you don’t respond quickly, you lose trust.
Final Verdict: From Chaos to Organized Communication
You now know exactly why customer inquiry forms matter, how to build one that works, and what mistakes to avoid. The gap between knowing and doing? That’s usually just decision paralysis.
Start simple. Pick your five essential fields. Choose a clean template. Launch it within the next 24 hours, even if it’s not perfect. You can always refine it later based on real customer feedback.
Think about what your customer service looks like six months from now. No more scrambling through scattered messages. No more missed opportunities. No more wasting time on back-and-forth clarification emails. Just organized, efficient customer communication that makes both you and your customers happier.
So your customers deserve a simple way to reach you and you deserve an organized way to help them.
Find Mostly Asked Questions by Users While Making an Inquiry Form
Can I integrate my inquiry form with a CRM or email marketing tool?
Yes, you can! Most modern form builders (like Bit Form or Bit Integrations) support direct integration with popular CRMs such as HubSpot, Zoho CRM, Salesforce, and email tools like Mailchimp or Sendinblue. These integrations automatically send form submissions to your preferred platforms, so you never miss a lead.
How can I make my inquiry form mobile-friendly?
Ensure your form builder supports responsive design. Platforms like Bit Form automatically adjust layouts for all screen sizes. You can also preview your form on different devices to check alignment, input spacing, and readability before publishing.
Is it possible to receive email notifications when someone submits a form?
Absolutely! Enable email notifications in your form settings inside Bit Form. Tools like Bit SMTP (natively integrated in Bit Form) can ensure reliable delivery of those notifications, preventing them from landing in spam folders. You can even customize the notification template with dynamic fields like name, email, or message.
Can I add file uploads (like images, PDFs, or documents) to my customer inquiry form?
Yes. Bit Form allows users to add a file upload field. Make sure you define accepted file types (e.g., “.pdf“, “.jpg", “.docx") and set a maximum file size to prevent server overloads.
How can I protect my inquiry form from spam or bot submissions?
You can enable reCAPTCHA or hCaptcha protection. Many WordPress form plugins like Bit Form offer built-in spam filters and honeypot techniques to block automated spam entries without affecting real users.
Where are the submitted form entries stored?
By default, most WordPress form builders store submissions in your WordPress database. However, you can also sync entries with Google Sheets, CRMs, or external databases via Bit Integrations for centralized management and data backup.
Can I add conditional logic to my inquiry form?
Yes! Conditional logic lets you show or hide fields based on previous user responses. For example, if a user selects “Technical Support,” you can display additional fields asking for product details or screenshots.
What should I do if my form is not submitting or showing an error?
Start by checking:
Your SMTP settings (using Bit SMTP for reliable mail sending)
Whether any required fields are missing
If your API keys (for CRMs or reCAPTCHA) are correct
If the issue persists, temporarily deactivate other plugins to rule out conflicts.
How can I track form performance and submissions?
Integrate your form with Google Analytics or Facebook Pixel to measure conversions and user behavior. Some tools also provide built-in analytics showing views, submissions, and conversion rates.
Can I customize the thank-you message or redirect users after form submission?
Yes, you can display a custom success message or redirect users to a thank-you page using Bit Form, where you can promote related services, downloads, or offers.
Is it possible to pre-fill form fields dynamically?
Definitely. You can pre-fill fields using URL parameters or logged-in user data. This is especially useful for returning customers or users coming from specific campaigns.
How can I export form submissions for reporting or analysis?
Most form builders let you export entries to CSV or Excel format. If you’re using Bit Form, you can automate this using Bit Integrations to send data directly to Google Sheets or CRM systems in real time.

Related Blog

How to Add a “How Did You Hear About Us” Survey in WordPress

How to Prevent Spam Form Submissions in WordPress